ÕISi info ja abi avalikule kasutajale
ÕISi info ja abi õppijale
ÕISi info ja abi õppejõule
ÕISi info ja abi programmijuhile
Kui õppeaines kasutatakse lõpphindamist ja õppija korralise hindamise tulemus on negatiivne, on tal õigus ühele (kursusesüsteemis kohustuslikes ainetes kahele) kordushindamisele õppeaine toimumise semestril.
Kui õppeaines kasutatakse pidevhindamist, võimaldatakse õppijal vahehindamisi järele teha ainult siis, kui see on mõistlikult oodatav ja lähtutakse heast tavast, et hindamine on õiglane, erapooletu ninga õppimist toetav.
Kui õppeaines kasutatakse kombineeritud hindamist, lähtutakse lõpphindamise ja pidevhindamise kohta sätestatust, arvestades kombineeritud hindamise olemust selles õppeaines.
Vaata ka ÕKE p 50.
- Kordushindamise tulemuse saad sisestada õppijale, kelle korralise hindamise tulemus on kinnitatud.
- Kordushndamise tulemuse saad sisestada siis, kui lisatud on kordushindamise hinneteleht või ÕISi on lisatud kordushindamise toimumine ja õppija on sellele registreerunud.
If the final assessment is used in the course and the result of the regular assessment of the student is negative, they are entitled to one (two for compulsory courses taught in the year system) resit in the semester the course is taught.
If continuous assessment is used in a course, the learner will only be allowed to carry out interim assessments if this is reasonably foreseeable and based on good practice that the assessment is fair, impartial and supportive of learning.
If a combined assessment is used in a course, the provisions on final assessment and continuous assessment shall be followed, taking into account the nature of the combined assessment in that course.
See also Study Regulations p 50.
- You can enter the grade of the resit for a student whose regular assessment grade has been confirmed.
- You can enter resit result after adding a resit grading sheet or the re-assessment event has been added to the SIS and the learner has registered for it.
Kordushindamise lehe lisamine
Kordushindamise lehe loomiseks vajuta hinnete lehel kolmikpunktmenüüs (joonisel p 1) lingile Loo kordushindamise hinneteleht (joonisel p 2).

Kui hinne on sisestatud, kuvatakse õppija kordushindamise hinnetelehele.
Adding a resit grading sheet
To create a resit grading sheet, click the Add resit grading sheet (Figure 2) link in the three-point menu (Figure 1) on the grades page.

Once the grade is entered, the learner will be re-assessed on the grade sheet.
Kordushindamise tulemuse sisestamine
Kordushindamise tulemuse sisestamiseks vali korralise tulemuse juures pliiatsi nupule vajutades (joonisel p 1) Lisa kordushindamise hinne (joonisel p 2).

Entering the grades of the resit
To enter a resit result, select Add resit grade (Figure 2) from the pencil menu (Figure 1) next to the regular result.

Kordushindamise tulemuse saad sisestada samamoodi nagu korralise hindamise tulemuse.
You can enter the result of the resit in the same way as the result of the regular assessment.
- Hindeid saad sisestada ühekaupa või sisestades sama hinde mitmele õppijale korraga.
- Hindeid saad sisestada hinnetelehel või õppija hinde kaardil.
- You can enter grades one at a time or the same grade for multiple learners at once.
- You can enter grades on the grading sheet or on the learner's grade card.
Kuidas saan sisestada ühe hinde?
Õppijale hinde sisestamiseks on mitu moodust.
Kõige lihtsam on hinnet sisestada õppija nime real lõpphinde veerus (joonisel p 1). Väljal olevale pliiatsi ikoonile vajutades avaneb hüpikaknas hindeskaala. Hinnet saad valida sobivale hindele vajutades. Sinu poolt määratud hinne on kohe ka õppijale nähtav.

Õppijale saad hinnet sisetada ka hinde lahtri paremas servas plussmärgi kaudu. Kui hoiad hiirekursorit märgi kohal avaneb hüpikaknas hindeskaala, millest saad valida õppija hinde (joonisel p 2).

Vajutades uuesti lõpphinde veerule kuvatakse õppijale määratud hinne paksus kirjas (joonisel p 3).

Hinnet saad sisestada ka õppija hindekaardilt. Vajutades õppija nimele avaneb hüpikaknas õppija hindekaart. Hindeskaala kuvamiseks vajuta Lõpphinne juures pliiatsi ikoonile. Hinnet saad määrata, kui vajutad hindele, mida õppijale määrata soovid. Juhul kui õppijat ei ole veel hinnatud saad õppija hindekaardilt sisestada korralise hindamise tulemuse.
How can I enter one grade?
There are several ways to enter a grade for a learner.
The easiest way to enter a grade is in the grade box behind learner's name (see figure p 1 ). Clicking on a pencil icon will open a grading scale in a pop-up window. You can select a grade by clicking on it. The grade you set is immediately visible to the learner.

You can also enter a grade for the learner from the plus sign on the right side of the grade box. When you hover the mouse cursor over the plus sign, a grade scale opens in a pop-up window, from which you can select the learner's grade (see figure p 2).

Clicking the grades cell again will display the grade assigned to learner in bold (see figure p 3).

Another option is to enter a grade from the learner's grade card. Clicking on a learner's name will open the learner's grade card in a pop-up window. Click the pencil icon next to Final grade to display the grading scale. You can set a grade by clicking on the grade you want to assign to the learner. If the learner has not yet been assessed, you can enter the result of the regular assessment from the student's grade card.
Kuidas sisestada korraga hinnet mitmele õppijale?
How can I enter a grade for several students at the same time?
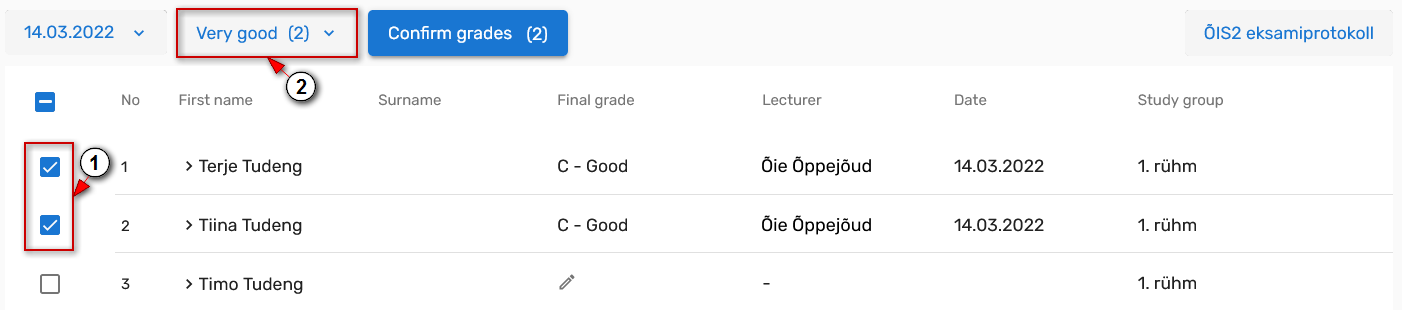
Kui õppeaines on palju õppijaid, on mugav kasutada korraga mitmele õppijale sama hinde määramise võimalust.
Hinde määramise nupp kuvatakse hinnetelehe tabeli päisesse, kui nimekirjast on valitud vähemalt üks õppija.
Täida märkeruudud õppijate nimede ees (joonisel p 1). Kui oled nimekirjast valinud need õppijad, kellele soovid ühesugust hinnet määrata, vajuta hinnetelehe päises olevale hinde nupule (joonisel p 2).

- Kui hindeid ei ole veel hinnete nupust määratud kuvatakse vaikimisi õppeaine hindeskaala kõrgeim hinne.
- Kui oled juba hindeid määranud, kuvatakse vaikimisi viimati määratud hinne.
Hinde nupule vajutades kuvatakse hindeskaala. Hinde määramiseks mitmele õppijale vali välja hinne ning vajuta nuppu Määra hinne (joonisel p 3). Hinde määramise nupule kuvatakse arvu, mitmele õppijale see hinne määratakse.

If there are many learners on the course, it is convenient to use the possibility to assign the same grade to several learners at once.
The button for assigning grades appears in the header of the grading sheet table if at least one learner is selected from the list.
Check boxes in front of the learners' names (see figure p 1). Once you have selected the learners to whom you would like to assign the same grade, click on the grade button in the header of the grading sheet (see figure p 2).
- If no grades have been assigned via the grades button, the highest grade in the course version's grading scale will be displayed by default.
- If you have already assigned a grade using the Assign a grade button, the last grade assigned will by displayed by default.
Pressing the grade button displays the grading scale for the course version. To assign a grade to several learners, select the grade and click the Set final grade button (see figure p 3). The button displays the number of learners to whom the grade will be assigned.

Kordushindamise kuupäeva saad muuta.
You can change the date of the resit.
- Hindamise kuupäev on õppija õppetulemuse kuupäev.
- Õppetulemus läheb õppija õppekava täitmise mahu arvutamisel arvesse sel semestril, mille kestuse sisse jääb hindamise kuupäev.
- Hindamise kuupäev kuvatakse õppija õppetulemuste lehele ÕISis ja akadeemilisele õiendile.
Vaikimisi kuvatakse hindamise kuupäevaks tänane kuupäev.
Vaikimisi määratud hindamise kuupäeva muutmiseks täida õppija nime rea ees märkeruut (joonisel p 1) ja ava hinnete tabeli päise kohal kuupäeva valiku aken (joonisel p 2).

Sisesta uus kuupäev klaviatuurilt või vali kalendrist (joonisel p 1). Vajuta kuupäeva kinnitamiseks nupule Määra kuupäev (joonisel p 2).

- Pärast kuupäeva määramist sisestatud hinde kuupäevaks märgitakse see uus muudetud kuupäev.
- Kuupäeva saad muuta ka siis, kui õppijale on juba hinne sisestatud.
- Kui mitmele õppijale on juba hinded sisestatud, täida nende hindamise kuupäeva muutmiseks märkeruudud kõigi õppijate ridade ees ja määra kuupäev.
- Kui õppija on lõpp- või kordushindamisele registreerunud, kuvatakse vaikimisi hindamise kuupäevaks tunni toimumise kuupäev.
- Sellise õppija hindamise kuupäeva muutmise soovist teata ois.tugi@ut.ee
- The date of assessment is the date of the learner's learning outcome.
- The study result is taken into account in the semester in which the assessment date falls when calculating the volume of completion of the student's curriculum.
- The date of the assessment is displayed on the learner's study results page in SIS and on the academic transcript.
By default, today's date is displayed as the grading date.
To change the default grading date, fill in the checkbox in front of the learner's name line (see figure p 1) and open the date selection window above the header of the grading table (see figure p 2).

Enter the new date on the keyboard or select from the calendar (see figure p 1). Click the Set date button to confirm the date (see figure p 2).

- If you enter a new grade after setting a date, that new date is set as the date of that grade.
- You can also change the date if a grade has already been entered for the learner.
- If grades have already been entered for more than one learner, fill in the checkboxes in front of all learners and set the date to change their grading date.
- If the learner has registered for the final assessment or resit, the date of the event will be displayed by default.
- Let us know at ois.tugi@ut.ee if it is necessary to change the date of such a grade.
Hindamise kuupäeva muutmine - videojuhend
Video vaatamiseks pead olema TÜ kasutajakontoga Microsoft Stream keskkonda sisse logitud. Logimiseks kliki sign in video aknas, sisesta uues aknas oma kasutajakonto andmed kujul: kasutajatunnus@ut.ee, sisesta parool ja vajuta nupule Sign in.
Video on eesti keeles. Videot on võimalik vaadata koos eesti- või ingliskeelsete subtittritega. Subtiitrite valimiseks pane video mängima ja vali (hammasratta ikoon) Settings → Captions / Subtitles.
Changing grading date - video tutorial
You must be logged in to the Microsoft Stream with a UT account to watch the video. To log in, click sign in on the video, enter your username in the new window as username@ut.ee, enter the password and click Sign in.
The video is in Estonian. The video can be watched with English or Estonian subtitles. To select subtitles, play the video and select (gear icon) Settings → Captions / Subtitles.
Kordushindamise tulemust saad muuta ja kustutada.
You can edit the result of the resit.
Muuta saad nii kinnitatud kui kinnitamata hinnet.
Kinnitatud hinne kuvatakse paksus kirjas.
You can change the grades that have to be confirmed or have already been confirmed.
A confirmed grade is shown in bold.
Hinne on veel kinnitamata
Juhul kui õppijale sisestatud hinne on kinnitamata, saad seda muuta või kustutada õppija hindekaardilt või hinnetelehe veerus "Lõpphinne".
Kinnitamata hinde muutmiseks hinnetelehe veerust "Lõpphinne" vajuta õppija nime taga olevale hinde lahtrile. Hüpikaknas avaneb õppija hindekaart, millele kuvatakse õppijale ÕIS-i sisestatud hinne, õppijat hinnanud õppejõu(dude) nimi(ed) ning hindamise kuupäev.
Hinnet saad muuta hindekaardil oleval hinnetepaneelil (joonisel p 1). Hinde kustutamiseks vajuta prügikasti ikoonile (joonisel p 2).

Hinnet saad muuta ka mitmel õppijal korraaga, kui tähistad õppijate nimede ees olevad märkeruudud (joonisel p 3) ning vajutad hinnetelehel tabeli kohal hinnete nuppu (joonisel p 4).

Avaneval hinnetepaneelil vali uus hinne (joonisel p 5). Hinde määramiseks vajuta nupule Määra lõpphinne (joonisel p 6).

The grade has not been confirmed
If the grade that has been submitted to the SIS is not confirmed, you can change or delete it from the learner's personal grade card or in the "Final grade" column of the grading sheet.
To change an unconfirmed grade in the "Final grade" column of the grade sheet, click the grade box behind the learner's name. A pop-up window will open showing the learner's grade, the name(s) of the lecturer(s) who have assessed the learner and the grading date.
You can change the grade in the grade panel on the learner's grade card (see p 1). To delete a grade, click on the Trash can icon (see p 2).

You can also change a grade for several learners at once by checking the boxes in front of the learners names (see p 3) and clicking the grades button which is located at the top of the table on the grading sheet (see p 4).

The grade panel opens. Choose a new grade (see p 5). To set a score, click the Set final grade button (see p 6).

Hinne on kinnitatud
Kinnitatud hinde muutmiseks tuleb tühistada viimasena kinnitatud hinne. Juhul kui õppijal on kinnitatud ka kordushindamise tulemus, tuleb põhihindamise kinnitatud tulemuse muutmiseks tühistada nii kordus- kui põhihindamise tulemused.
Kinnitatud hinde tühistamiseks ava selle õppija hindekaart, kelle tulemust soovid tühistada. Hindekaardi avamiseks vajuta õppija hindele. Vali kolmikpunktmenüüst (joonisel p 1) Tühista hinne (joonisel p 2).

Hinde tühistamiseks pead lisama vähemalt 10 tärgi pikkuse selgituse. Kui sisestatud põhjendus on piisavalt pikk, muutub Tühista hinne nupp aktiivseks.
Kõiki tühistatud hindeid saad vaadata õppija hindekaardil, avades menüüploki "Tühistatud hinded".
The grade has been confirmed
To change a confirmed grade, the last confirmed grade must be canceled. If the learner has also a confirmed resit grade, the grades for the resit and regular assessment must be cancelled in order to change the confirmed grade of the regular assessment.
To cancel a confirmed grade, open the grade card of the learner whose result you want to cancel. Click on a learner's grade to open the grade card. Choose from the three-point menu (see p 1) Cancel grade (see p 2).

You must add an explanation of at least 10 characters to cancel the grade. When the entered explanation is long enough, the Cancel grade button becomes active.
All canceled grades can be viewed on the learner's grade card by opening the "Canceled grades" menu block.
Hinnete muutmine - videojuhend
Video vaatamiseks pead olema TÜ kasutajakontoga Microsoft Stream keskkonda sisse logitud. Logimiseks kliki sign in video aknas, sisesta uues aknas oma kasutajakonto andmed kujul: kasutajatunnus@ut.ee, sisesta parool ja vajuta nupule Sign in.
Video on eesti keeles. Videot on võimalik vaadata koos eesti- või ingliskeelsete subtittritega. Subtiitrite valimiseks pane video mängima ja vali (hammasratta ikoon) Settings → Captions / Subtitles.
Entering muutmine - video tutorial
You must be logged in to the Microsoft Stream with a UT account to watch the video. To log in, click sign in on the video, enter your username in the new window as username@ut.ee, enter the password and click Sign in.
The video is in Estonian. The video can be watched with English or Estonian subtitles. To select subtitles, play the video and select (gear icon) Settings → Captions / Subtitles.
Kordushindamise tulemuse saad kustutada.
You can delete the result of the resit.
Kustutada saad ainult kinnitamata hinnet.
Juhul kui oled õppijale sisestanud hinde, kuid soovid seda mingil põhjusel kustutada, saad seda teha õppija hindekaardil.
Õppija hindekaart avaneb, kui vajutad hinnetelehel õppija nimele (joonisel p 1) või lõpphinnete veerus õppijale sisestatud hindele (joonisel p 2).

Kui vajutasid õppija nimele, vajuta selle hinde muutmiseks/kustutamiseks pliiatsi ikoonile (joonisel p 3).

Hinnet saad kustutada õppija hindekaardil hinnete realt, vajutades prügikasti ikoonile (joonisel p 4).

Kui õppija hinne on juba kinnitatud, siis hinnet kustutada ei saa. Kinnitatud hinnet on võimalik tühistada. Kui hinne on tühistatud, saad sisestada uue hinde.
Only a grade that has not been confirmed can be deleted.
When you have already entered a grade to the SIS, but would like to remove it, then you can do it on the learner's personal grade card.
You can open the learner's grade sheet by clicking on the learner's name (see p 1) or by clicking the grade on the grading sheet's column Final grade (see p 2).

If you clicked on a learner's name, click on the pencil (see p 3) icon to change/delete that grade.

The learner's grade sheet will open as a pop-up. You can delete the grade by pressing the trashcan icon (see p 4).

If the learner's grade has already been confirmed, then you cannot delete the given grade. You can cancel a confirmed grade. If you cancel a grade, you can enter a new grade for the learner.
Kordushindamise tulemus tuleb kinnitada.
The result of the resit must be confirmed.
Overview
Content Tools