Õppekorralduse sõnaraamat
Õppekorralduslik info siseveebis![]()
Pane tähele!
Alates 2023. aasta 20. veebruarist kasutavad kõik õppejõud oma tööks ÕIS2. Vaata olemasolevate ja lisanduvate funktsioonide loetelu.
ÕIS2 kasutamisel on sulle abiks ka ÕISi kasutajatugi (portaal https://it.ut.ee/, ois.tugi@ut.ee, 737 6615).
Attention!
From 20 February 2023, all teaching staff will use SIS2. Have a look at the overview of all the functions created for teaching staff member.
You can also get advice on using SIS2 from SIS user support (request portal https://it.ut.ee/, ois.tugi@ut.ee, 737 6615).
Hindamiskorralduses lähtutakse heast tavast, et hindamine on õiglane, erapooletu ja õppimist toetav.
Loe täpsemalt ÕKE (p 44 - 66).
In the organisation of assessment, the good practice is observed that assessment is fair, unbiased and supportive of learning.
See also Study Regulations (p 44 - 66).
Hinnete sisestamine - videojuhend
Videojuhend kirjeldab hinnete sisestamise peamist töövoogu. Täpsemad teemad leiad alt poolt.
Video vaatamiseks pead olema TÜ kasutajakontoga Microsoft Stream keskkonda sisse logitud. Logimiseks kliki sign in video aknas, sisesta uues aknas oma kasutajakonto andmed kujul: kasutajatunnus@ut.ee, sisesta parool ja vajuta nupule Sign in.
Video on eesti keeles. Videot on võimalik vaadata koos eesti- või ingliskeelsete subtiitritega. Subtiitrite valimiseks pane video mängima ja vali (hammasratta ikoon) Settings → Captions / Subtitles.
Entering grades - video tutorial
The video tutorial describes the main workflow for entering grades. You can find more detailed topics below.
You must be logged in to the Microsoft Stream with a UT account to watch the video. To log in, click sign in on the video, enter your username in the new window as username@ut.ee, enter the password and click Sign in.
The video is in Estonian. The video can be watched with English or Estonian subtitles. To select subtitles, play the video and select (gear icon) Settings → Captions / Subtitles.
Esimene samm: korralise hindamise tulemuste sisestmine
Step 1: Enter the results of the regular assessment
Õppejõud saab hallata selle õppeaine versiooni hindeid, mille andmetesse ta on õppejõuna lisatud.
Haldustugi saab hallata selle õppeaine versiooni hindeid, mille andmetesse ta on haldustoena lisatud.
Õppekorralduse spetsialist saab hallata
- sellesse õppekavva kuuluvate õppeainete hindeid, mille andmetesse ta on õppijaid nõustava õppekorralduse spetsialistina lisatud
- oma struktuuriüksuse õppeainete hindeid.
Õppejõuna või haldustoena hinnete sisestamiseks
- logi sisse ÕIS2 keskkonnas
- vali õppejõu roll
Seni kuni ÕIS2 hinnetelehele pole sisestatud ega kinnitatud ühtegi lõpphinnet, saad hinnete sisestamist alustada ka ÕIS1-s.
Juhul kui hinnete sisestamist on alustatud ÕIS1-s, siis kuvatakse ÕIS2-s teadet ning hinnete sisestamist tuleb jätkata ÕIS1-s.

Academic staff member can manage the grades of the version of the course to which they are added as lecturers.
Administrative support can manage the grades of the version of the course to which they are added as administrative support.
Academic affairs specialist can manage the grades of the courses
- included in the curriculum, in the data of which they are included as an academic affairs specialist
- in their structural unit.
To enter grades as a lecturer or administrative support assistant
- log in SIS2
- select a role of a lecturer
As long as no grades have been entered or confirmed in the SIS2, you still start entering grades in the SIS1.
If you or any other lecturer for the courses has started entering grades in the SIS1, a message will be displayed in the SIS2 and the entry of grades must be continued in the SIS1.

Kuidas jõuan hinnetelehele?
Oma õppeainetega tegelemiseks, sh hinnete sisestamiseks, ava õppeainete nimekiri, selleks vajuta kas:
- vidina Minu loetavad õppeained pealkirjale (joonisel p 1)
- Minu õppeained lingile õppejõu menüüs (joonisel p 2)
- mõne kindla õppeaine nimetusele (joonisel p 3)
Tutvu ka juhendiga: "Minu õppeained".

Õppeaine versiooni hinnetelehele jõudmiseks vajuta õppeaine versiooni juures nupule Hinded (joonisel p 1).

Hinnetelehele saad liikuda ka õppeaine versiooni Moodle'i seoste lehelt.

Vajutades seal nuppu Hinded > (vt joonisel p 1), suunatakse sind õppeaine versiooni hinnetelehele. Tähelepanu! Hetkel on Moodle'i seoste lehel nupule Hinded vajutades hinnetelehele suunamine katki. Vaata Teadaolevaid vigu.

Vaikimisi kuvatakse kõik antud õppeaine versiooni raames loodud hinnetelehtedel olevad õppijad ning neile sisestatud hinded ja õppijaid hinnanud õppejõud.
How can I get the grading page?
To manage your courses, etc. entering grades, open the list of coursesby clicking either:
- the My Courses widget title (see figure p 1)
- the My Courses on lecturer's menu (see figure p 2)
- on the course title (see figure p 3)
For more information see also "My courses".

Click on the Grades (see figure p 1) next to the course version to access the course version grading page.

You can also go to the grading sheet page from while checking course version's Moodle settings.

Clicking the Grades > button (see figure p 1) will take you to the grading page of the course version. Attention! The link on pressing the Grades button from Moodle settings is currently broken and does not take to the grading sheet. See Known issues.

By default, all learners on the grading sheets created within the given version of the course with the grades entered on them and the lecturers who evaluated the learners are displayed.
Mida hinnetelehel näidatakse?
- Hinnetelehe päisesse kuvatakse ainekood ja nimetus, aine versioon, õppeaine versiooni maht ja õppeaine versiooni keel.
- Lehe päises on nupud tagasi Minu õppeained nimekirja vaatesse liikumiseks ja õppeaine versiooni info vaatamiseks.
- Kõikide hinnetelehtede päisesse tegevuste plokki kuvatakse ka õppijate kiirotsingu riba.
- Tegevuste plokis on märkeruudud õppijate registreeringute (rühmad, kontrolltööd, korralise ja kordushindamise toimumised) vaatamiseks ning õppijate nimekirjade filtrid.
- Automaatselt kuvatakse korralise hindamise hinnetelehe eelvaade, millel on kõik õppijad, kellel on kehtiv (mitte tühistatud) registreering õppeainesse.
- Hinneteleht luuakse, kui oled sisestanud vähemalt ühe hinde.
What is shown on grading page?
- The code and title of the course, the version of the course, the volume in ECTS of the course version and the language of the course version are displayed in the header of the grading page.
- Use the buttons displayed in the page header to open the My courses list or to view information about the course version.
- A quick search bar for finding learners is also displayed in the header of all grading sheets.
- The activity block has checkboxes for viewing student registrations (groups, tests, regular and re-assessment) and learner list filters.
- Grading sheet's preview for a regular assessment is shown automatically, to which all learners who have a valid (not cancelled) registration for the course version are displayed.
- A grading sheet will be created when you enter at least one grade.
Kuidas leian õppija?
How do I find a learner?
Hinnetelehele kuvatakse kõik õppeaine versioonile registreeritud õppijad.
Nimekirjast ühe kindla õppija leidmiseks kasuta otsingut (vt joonis).

Otsida on võimalik õppija ees- või perekonnanime(de) kõigi osade järgi. Filtri rakendamiseks sisesta vähemalt üks tähemärk.
Kuvatakse ainult nende õppijate read, kelle nimed sisaldavad otsisõna.
The grading page shows all learners registered for the course version.
Use the search to find a specific learner (see figure).

You can search by all parts of the learner's first names or surnames. Enter at least one symbol for the filter to apply.
Only rows of learners whose name contain a search term are displayed.
Kuidas õppijate nimekirja filtreerida ja sorteerida?
How do I filter and sort student list?
- Filtrite kasutamine muudab oluliselt lihtsamaks ühise tunnusega (nt registreering korralisele eksamile) õppijatele hinnete samaaegse sisestamise. Vt alamjaotust "Kuidas sisestada hinnet mitmele õppijale korraga?"
- Kui õppija pole end hindamisele registreerinud, siis filtri "Hindamine" rakendamisel teda hinnetelehele ei kuvata.
- Juhul kui õppeainesse on registreerunud palju õppijaid, on mugav kasutada hinnetelehe sorteerimise ja filtreerimise võimalust.
- Kasutatud filtreid kuvatakse nimekirja filtrite paneeli alla hallide nuppude.
- Using filters makes it much easier for you to find and grade the learners with a common feature (eg registration for a regular assessment) to enter grades at the same time for several learners. See "How can I enter multiple grades at the same time?".
- If a learner has not registered for assessment, he/she will not be shown on the grading sheet when the "Assessment" filter is applied.
- If there are many learners registered for the course version, the grading sheet can be sorted and filtered.
- The applied filters are displayed below the list filter panel as a button.
Nimekirja filtrid
Hinnetelehe filtreid on võimalik avada ja sulgeda kui vajutad nuppu Nimekirja filtrid (joonisel p 1). Nimekirja filtreid kuvatakse kõikide hinnetelehtede päisesse.
Vaikimisi rakenduvad filtrid, mis võimaldavad vaadata kõikide hinnetelehtede kõiki sisestatud hindeid (joonisel p 2). Juhul kui õppeaines on rühmad, kuvatakse hinnetelehele ka filtrit Rühm). Rühma filtri valimisel kuvatakse hinnetelehele valitud rühma registreerunud õppijad.

Korraga on võimalik kasutada ka mitut erinevat filtrit: nt Hinneteleht: "Korraline hindamine" + Hindamine: "Korraline hindamine " + Hinded: "Hindeta". Sellisel juhul kuvatakse korralise hindamise hinnetelehele ainult neid õppijaid, kes on end registeerinud teatud kuupäeval toimunud eksamile/arvestusele ning kellele ei ole veel ÕIS-is hinnet sisestatud (joonisel p 3).

Rakendatud filtreid kuvatakse hallide mummudena ning neid saab eemaldada nii üksikult kui ka kõiki korraga. Üksiku filtreerimistunnuse eemaldamiseks tuleb vajutada hallil mummul olevat X nuppu ning kõikide rakendatud filtrite eemaldamiseks vajuta sinise läbikriipsutusega kolmnurgale (vt joonist).

List filters
Grading sheet filters can be opened and closed by pressing the List filters button (see figure p 1). The list filters are displayed in the header of all grading sheets.

By default, filter is applied that allows you to view all the grades entered in all grading sheets (see figure p 2). If there are groups in the course, the Group filter will also be displayed on the grading sheet. When you select a group filter, learners enrolled in the selected group are displayed on the grading sheet.

User can apply several filters at the same time: e.g., Grading sheet: "Regular assessment" + Grades: "Without grades". In this case, only those learners who have registered for the assessment on a certain date and who do not have a grade entered to the SIS will be displayed on the grading sheet (see figure p 3).

Applied filters are displayed as gray buttons and can be removed individually or all at once. To remove a single filter press on the X on the displayed filter button or if you would like to remove all applied filters at once press on the blue triangle with strikethrough.

Hinnetelehtede filter
Korralise hindamise hinnetelehe vaatamiseks vali rippmenüüst filter "Korraline hindamine" (joonisel p 1). Sisestatud vahetulemuste hinnetelehe vaatamiseks vali filter "Vahetulemus: vahetulemuse nimetus".
Kordushindamise hinnetelehe vaatamiseks vali filter "Kordushindamine".

Grading sheet filters
To view the regular assessment grading sheet, select the "Regular assessment" filter from the drop-down menu (see figure p 1). Select the "Intermediate Result: Intermediate Result Name" filter to view the grading sheet for the intermediate results column which has been added to the grading sheet.
To view the grading sheet for resit, select the "Resit" filter.

Hinnete filtrid
Soovi korral saad filtreerida õppijate nimekirja ka hinnete filtri abil. Vaikimisi kuvatakse kõik hinded. Saad valida ilma hindeta õppijad või vaadata, missugustele õppijatele on juba hinne sisestatud (vt joonist).

Lõpphinnete mugavaks kinnitamiseks saad hinnetelehte filtreerida kinnitamata hinnete tunnuse alusel. Juhul kui soovid näha, kellel õppijatest on hinne juba kinnitatud, siis kasuta selleks kinnitatud hinnete filtrit. Samuti saad hinnetelehte filtreerida tühistatud hinnete või negatiivsete hinnete tunnuse alusel.
Vajalikku hinnete filtrit saad valida hinnetelehe päises olevast rippmenüüst Hinded.
Grades filters
If you want, you can also filter the list of learners using the grade filter. By default, all grades are displayed. You can select filter "Without a grade" to see the list of learners without a grade or view which learners have already been graded (see figure)

To conveniently confirm final grades for the course, you can filter the grading sheet by the Unconfirmed grade filter. If you would like to see which learners have a confirmed grade, use the "Confimed" filter. You can also filter the grading sheet to view canceled grades or negative grades.
You can select the required grade filter from the drop-down menu Grades in the header of the grading sheet.
Kuidas saan sorteerida õppijate nimekirja?
Õppijate nimekirja on võimalik järjestada eesnime, perekonnanime, hinnete, õppejõudude ja rühmade järgi nii kasvavas kui kahanevas järjestuses.
Vaikimisi ei ole määratud ühtegi sorteerimisalust. Hinnetelehe sorteerimiseks tuleb vajutada veeru päisele. Ühekordsel vajutamisel kuvatakse sorteerimise aluseks oleva veeru päisesse noolt ↑ ning nimekiri kuvatakse kasvavas järjestuses, teistkordsel klõpsamisel noolt ↓ ning nimekiri kuvatakse kahanevas järjestuses. Kolmas klõps eemaldab sorteerimise tunnuse.

How can I sort the learners list?
The list of students can be sorted by first name, last name, grades, lecturers and groups in ascending or descending order.
No sort criteria are specified by default. To sort the grading sheet, click on the column header. Clicking once displays an arrow ↑ in the header of the sorting column, and the list appears in ascending order, a second click displays an arrow ↓ and the list appears in descending order. A third click removes the sort indicator.

Registreeringud
Tähistades hinnetelehe päises märkeruudu Registreeringud kuvatakse õppijate registreeringud kontrolltöödele, korralisele ja kordushindamisele. Kui märkeruut on tähistatud, saad õppijale hinnet sisestada õppija hindekaardilt.

Infosildid
Kolmpunkt menüüst vasakul paiknevad infosildid, mis annavad märku, mitu õppijat on hinnetelehel kokku, kui mitmele õppijale on sisestatud lõpphinne ning kui paljud õppijad on veel hindamata (infonupp Hindeta). Lisaks kuvatakse teavet, mitmel õppijal on hinne Kinnitatud ning mitu hinnet vajab veel kinnitamist (nupp Kinnitamata).
Hindeta ja kinnitamata hinde infosildid kuvatakse roosal taustal. Muud infosildid on helehalli värvi.

Juhul kui kõik hinnetelehel olevad õppijad on hinnatud, siis ei kuvata enam Hindeta õppijate silti. Sama moodi ei kuvata enam Kinnitamata hinnete silti, kui kõik lõpphinded on kinnitatud.
Registrations
By checking the Registrations in the header of the grading sheet, learners' registrations for tests, regular assessment and resit will be displayed. If the check box is checked, you can enter a grade for the learner from the learner's grade card.

Informative labels
To the left of the three-point menu are informative labels that indicate how many learners are on the grading sheet., how many learners have received a final grade and how many learners have not yet been assessed by the lecturer (information button Without grades). In addition, information is displayed on how many final grades have been Confirmed and how many grades still need to be confirmed (Unconfirmed button).
Labels Without grade and Unconfirmed are displayed on a pink background. Other informative labels are light gray.

When all learners on the grading sheet have been assessed, the label Without grades is not displayed. When all grades on the grading sheet are confirmed, the label Uncoinfirmed is not displayed.
Kuidas sisestada vahetulemusi?
How can I add intermediate results?
- Iga vahetulemuste veeru jaoks luuakse eraldi hinneteleht.
- Vahetulemusi saad hallata nii hindamise hinnetelehelt kui ka vahetulemuse hinnetelehel.
- Vahetulemuse veeru nimetuse pikkus on kuni 10 tärki.
- Hetkel Moodle'ist vahetulemusi ei impordita.
- A separate grading sheet is created for each intermediate result column.
- You can manage intermediate results from both the grading sheets and the intermediate result grading sheet.
The name of the intermediate result column can be up to 10 characters.
- Intermediate results can currently not be imported from Moodle.
Kuidas lisada vahetulemuste veergu?
Vahetulemuste veerg lisatakse kõigile nimekirjas olevatele õppijatele, sh neile, kelle hinne on juba kinnitatud.
Vali hinneteleht, millele soovid vahetulemuste veergu lisada. Selleks kasuta Hinneteleht rippmenüüd lehe päises (joonisel p 1).

Vahetulemuste veeru lisamiseks hinnetelehele vali kolmpunkt menüüst Vahetulemused (joonisel p 2).

Hinnetelehe päisesse tekib plussmärgiga nupp (joonisel p 3).

Nupule vajutades avatakse tekstilahter, kuhu saad sisestada vahetulemuste veeru nimetuse (kuni 10 tärki) (joonisel p 4). Pärast nimetuse sisestamist vajuta nupule Salvesta (joonisel p 5).

Seejärel kuvatakse lisatud vahetulemuste veerg sinu poolt valitud hinnetelehele. Iga lisatud vahetulemuste veeru kohta luuakse automaatselt eraldi hinneteleht.
Lisatud vahetulemusi saad vaadata nii kõikide hinnetelehtede, korralise lõpphindamise hinnetelehe kui ka kordushindamise hinnetelehelt, juhul kui sinna on vahetulemusi lisatud. Lisatud vahetulemuste veerge on võimalik kuvada täite märkeruudu Vahetulemused (joonisel p 6) lehe päises kuvatakse hinnetelehele kõik sisestatud vahetulemuste veerud tähestikulises järjestusest vasakult paremale. Juhul kui veeru nimetus sisaldab ainult numbreid, siis kuvatakse kõigepealt numbrid kasvavas järjekorras ning seejärel tähti sisaldavad veerud kasvavas järjestuses.

Märkeruudust tühjendamise järel vahetulemuste veerge ei kuvata.
Vahetulemuste hinnetelehele kuvamiseks vali Hinneteleht rippmenüüd lehe päises see vahetulemuste hinneteleht (nt "Vahetulemused: Essee").
Vahetulemuste veeru nimetuse muutmiseks vali kolmpunktmenüüst Vahetulemused. Seejärel kuvatakse hinnetelehe päisesse vahetulemuste paneel. Veeru nimetuse muutmiseks vajuta pliiatsi ikoonile (joonisel p 7).

Sisesta uus nimetus. Muudatuste salvestamiseks vajuta nupule Muuda (joonisel p 8).

How can I create an intermediate result column?
The intermediate results column will be added to all learners on the grading list, including those whose grades have already been confirmed.
Select the grading sheet to which you would like to add the intermediate results column. To do this, use the Grading sheet drop-down menu in the page header (see figure p 1).

To add a column of intermediate results to the selected grading sheet, click on the three-point menu and select Intermediate results (see figure p 2).

A button with a plus sign appears in the header of the grading page (see figure p 3).

Pressing the button opens a text box where you can enter the name of the intermediate results column (up to 10 characters) (see figure p 4). After entering the name, press the Save button (see figure p 5).

The intermediate results column will then be added on the grading sheet you selected. A separate grading sheet is automatically created for each intermediate results column added.
You can view the added intermediate results on the general grading sheet, on the regular assessment grading sheet as well as on the resit grading sheet, if intermediate results have been added. The columns of the intermediate results can be shown by selecting the intermediate results columns checkbox in the header of the page (see figure p 6). All the intermediate results columns entered will be displayed in alphabetical order from left to right. If the column name contains only numbers, the numbers are displayed first in ascending order, and then the columns containing the letters are displayed in ascending order.

When you clear the checkbox, the intermediate results columns are not displayed.
You can display the separate intermediate results grading sheet (e.g. "Intermediate results: Essay") from the Grading sheet dropdown menu in the header of the grading page.
To rename the intermediate results column, select Intermediate results from the three-point menu. The intermediate results panel is then displayed in the grading page header. To rename a column, click the pencil icon (see figure p 7).

Enter a new name and press the Change button to save the changes made (seefigure p 8).

Kuidas sisestada vahetulemusi?
- Vahetulemuste punkte saad sisestada ainult numbritena.
- Kui sisestatav tulemus ei ole täisarv, kasuta komakoha tähistamiseks punkti.
- Hetkel ei kuvata õppijatele ÕIS2-s sisestatud vahetulemusi.
- Vahetulemuse hindeid saad kinnitada vahetulemuse hinnetelehelt.
- Vahetulemuste veeru eemaldamiseks peavad sellelt olema eemaldatud kõik tulemused.
- ÕIS arvutab kõik sisestatud vahetulemuste summa ise kokku.
Vahetulemuste sisestamiseks on mitu võimalust.
Vahetulemusi saad sisestada otse hindamiskorra hinnetelehel olevasse tabeli veergu, vajutades selleks õppija nime taga vahetulemuse lahtril (joonisel p 1). Juhul kui sisestad vahetulemusi hinnetelehtede koondvaates , korralise hindamise või kordushindamise hinnetelehel, saad lahtrite vahel navigeerimiseks kasutada hiirekursorit.

Vahetulemusi saad sisestada ainult numbrilisel kujul. Negatiivset arvu sisestada ei saa. Soovitav on sisestada vahetulemuste hindeid skaalal 0 kuni 200 punkti. Vahetulemuse hindekaart avaneb, kui vajutad õppija nime real vahetulemuse lahtrile. Vahetulemusi saad sisestada nii klaviatuurilt kui kasutades nooli õppija vahetulemuse hindekaardil.
Juhul kui õppijale sisestatav vahetulemus ei ole täisarv, kasuta komakoha eristamiseks punkti. Sisestatud tulemuse saad salvestada, vajutades Salvesta nuppu (joonisel p 2).

Vahetulemusi saad sisestada ka õppija hindekaardilt. Õppija hindekaardile kuvatakse ka korralise või kordushindamise hinnetelehele lisatud vahetulemusi. Vahetulemuse sisestamiseks vajuta vahetulemuse nimetuse juures pliiatsi ikoonile (joonisel p 3). Seejärel sisesta ja salvesta tulemus.

Kolmas võimalus on sisestada vahetulemusi vahetulemuse hinnetelehel. Vahetulemuse hinnetelehe saad valida lehe päises Hinneteleht rippmenüüst.
Õppijale saad hinnet sisestada nii õppija nime real hinde lahtrist kui ka õppija hindekaardilt. Kui eelistad sisestada vahetulemuse hinnetelehe tabelist (joonisel p 4), saad lahtrite vahel navigeerimiseks kasutada nii kursorit kui tabulaatori nuppu. Tabelisse sisestatud vahetulemuste salvestamiseks pead vajutama tabeli päises Salvesta nuppu.

Kõik sisestatud vahetulemused arvutab ÕIS ise kokku ning koondsumma kuvatakse hinnetelehel veergu "Kokku". Vahetulemuste veergude tulemuste koondsumma kuvatakse hinnetelehele hallil taustal.
How can I enter intermediate results?
- Use numerical values to enter the intermediate results.
- If the result you are entering is not an integer, use a full stop to indicate a decimal point.
- At the moment, the intermediate results entered in the SIS 2 are not shown to the students.
- You can confirm the intermediate result on the intermediate result grading sheet.
- To remove an intermediate results column, all the intermadiate results must be deleted.
- The SIS calculates the sum of all the entered intermediate results itself.
There are several ways to enter intermediate results.
You can enter the intermediate results directly in the grades column of the assessment on the table on the grading sheet by clicking on the intermediate result box on the learner's row (see figure p 1). If you enter intermediate results in the summary view of the grading sheets or in the regular assessment or resit grading sheet, you can use the mouse cursor to navigate between the cells.

You can only enter intermediate results scores numerically. You cannot enter a negative numbers. It is recommended to enter the scores of the intermediate results on a scale of 0 to 200 points. The intermediate result score card opens when you click on the intermediate result box on the learner's row. You can enter intermediate results both from the keyboard and using the arrows on the student's intermediate result score field. If the score of the intermediate result to be entered for the learner is not an integer, use a full stop to separate the decimal point. You can save the result entered in the cell by pressing the Save button (see figure p 2).

You can also enter intermediate results from the learners's personal grade card. Intermediate results added to the regular or resit grading sheet are also displayed on the learner's personal grade card. To enter an intermediate result, click on the pencil icon (see figure p 3). Then enter and save the result.

The third option to enter intermediate results is from the grading sheet of a specific intermediate result. You can select an intermediate results grading sheet from the Grading sheet drop-down in the grading page header. The selected intermediate grading sheet will be displayed. You can enter a score for a learner both in the score box on the learner's row and on the learner's grade card. If you prefer to enter the intermediate result from the grading sheet table (see figure p 4), you can use both the cursor and the tab button to navigate between the cells. To save the intermediate results entered in the table, you need to press the Save button in the table header.

The SIS calculates the sum of all the entered intermediate results automatically and the total sum is displayed in the "Total" column of the grading sheet. The total sum of the intermediate results columns is displayed on a gray background on the grading sheet.
Kuidas saab vahetulemusi kustutada?
- Kustutada saad ainult kinnitamata vahetulemuse.
- Vahetulemuste veeru kustutamiseks peavad sellelt olema eemaldatud kõik tulemused.
Juhul kui vahetulemuste veergu pole veel tulemusi sisestatud, saad selle veeru kustutada, kui avad kolmpunktmenüüst "Vahetulemused" (joonisel p 1).

Veeru kustutamiseks vajuta vahetulemuse nimetuse taga prügikasti ikooni (joonisel p 2).

Üksiku vahetulemuse kustutamiseks vajuta õppija nime taga vahetulemuse lahtrile. Hüpikaknas avaneb õppija hindekaart. Vahetulemuse saad kustutada prügikasti ikoonile vajutades (joonisel p 3).

Vahetulemusi on võimalik kustutada ka vahetulemuste hinnetelehel. Vali vahetulemuse hinneteleht Hinneteleht rippmenüüst lehe päises. Seejärel kustuta tulemus klaviatuurilt tagasisammuklahviga (Backspace) või kui soovid kustutada korraga mitu tulemust, tähista hinnetelehel õppijate nimede ees märkeruudud. Valitud õppijate vahetulemuste kustutamises vajuta tabeli kohal nuppu Kustuta (joonisel p 4). Nii saad kustutada ka kõik hinnetelehel olevad kinnitamata vahetulemused. Kustuta nupp näitab, mitu vahetulemust kustutatakse.

How can I delete intermediate results?
- You can only delete an unconfirmed intermediate result.
- To delete an intermediate results column, all scores from the column must be removed.
If no results have yet been entered in the intermediate results column, you can delete this column by opening the "Intermediate results" menu from the three-point menu (see figure p 1).

To delete a column, click the trash can icon behind the title of the intermediate results column (see figure p 2).

To delete an individual intermediate result, click on the intermediate result box next to the learner's name. A learner's grade card opens in a pop-up window. You can delete the intermediate result by clicking on the trash can icon (see figure p 3).

Intermediate results can also be deleted from the intermediate results grading sheet. Select a grading sheet from the Grading sheet drop-down menu in the page header. Then delete the score with the backspace key or, if you would like to delete several results at once, check the boxes next to the names of the learners on the grading sheet. To delete the intermediate results of the selected learners, press the Delete button abow the table (see figure p 4). That way you can delete all unconfirmed intermediate results on the grading sheet. The Delete button shows the number of intermediate results to be deleted.

Kuidas vahetulemusi kinnitada?
Õppija vahetulemuse saad kinnitada ainult selle vahetulemuse hinnetelehel. Hinnetelehe saad valida lehekülje päises Hinneteleht rippmenüüst (joonisel p 1).

Õppija vahetulemuse saad kinnitada, kui tähistad õppija nime ees märkeruudu. Valida saad nii ühe õppija, mitu õppijat kui ka kõik õppijad.

Pärast märkeruutude täitmist kuvatakse tabeli päisesse nupp Kinnita vahetulemused (joonisel p 2). Nupule näidatakse, mitu tulemust korraga kinnitatakse. Kinnitatud tulemuse ette kuvatakse tabaluku ikoon.

How can I confirm intermediate results?
You can only confirm a learner's intermediate result on the grading sheet for a specific intermediate result. You can select a grading sheet from the Grading sheet drop-down menu in the page header (see figure p 1)

You can confirm a learner's intermediate result by checking the box in front of the learner's name. You can select one learner, several learners as well as all learners on the grading sheet.
After checking the boxes, the Confirm intermediate results button appear in the table header (see figure p 2). The button shows the number of intermediate results to be confirmed. A padlock icon is displayed in front of the confirmed score.

Kuidas vahetulemusi tühistada?
Õppijale sisestatud ja kinnitatud vahetulemust saad tühistada hinnetelehtede koondvaatest, korralise hindamise hinnetelehelt ning vahetulemuse hinnetelehel. Hinnetelehtede koondvaates ning korralise hindamise hinnetelehel saad õppija vahetulemust tühistada vajutades õppija nime real vahetulemuse lahtrile (joonisel p 1).

Hüpikaknas kuvatakse õppija vahetulemuse hindekaart. Kinnitatud tulemuse saad tühistada, kui valid kolmpunktmenüüst Tühista hinde kinnitus (joonisel p 2).

Hinde tühistamiseks pead sisestama vähemalt 5 tärgi pikkuse põhjenduse. Pärast põhjenduse sisestamist vajuta nuppu Tühista hinde kinnitus (joonisel p 3).

Õppijale sisestatud ja kinnitatud vahetulemust saad tühistada ka õppija hindekaardilt. Vahetulemuse kinnituse tühistamiseks vajuta vahetulemuse lahtrile (joonisel p 4).

Hüpikaknas avaneb õppija vahetulemuse hindekaart. Kolmpunkt menüüst vali Tühista hinde kinnitus (joonisel p 5). Vahetulemuse kinnituse tühistamiseks pead sisestama vähemalt 5 tärgi pikkuse põhjenduse.

Pärast põhjenduse sisestamist vajuta nuppu Tühista hinde kinnitus (joonisel p 6).

Pärast kinnitatud vahetulemuse tühistamist saad vahetulemust muuta või kustutada.
How can I cancel intermediate results?
You can cancel an intermediate result entered and confirmed for a learner from the summary view of the grading sheets, the regular assessment grading sheet and the intermediate results grading sheet. In the summary view of the grading sheets and on the grading sheet of the regular assessment, you can cancel the learner's intermediate result by clicking on the intermediate result box on the learner's name (see figure p 1).
A pop-up window displays a grade card for the learner's intermediate result. You can cancel a confirmed intermediate result by selecting Cancel grade confirmation from the three-point menu (see figure p 2).

You must enter an explanation for at least 5 characters to cancel the intermediate result. After entering the explanation, press the Cancel grade confirmation button (see figure p 3).

You can also cancel an intermediate result entered and confirmed for a learner from the learner's grade card. To cancel the intermediate result, click on the intermediate result box (see figure p 4).

A grade card for the learner's intermediate result opens in a pop-up window. From the three-point menu, select Cancel grade confirmation (see figure p 5). You must enter an explanation for at least 5 characters to cancel the intermediate result.

After entering the explanation, press the Cancel grade confirmation button (see figure p 6).

After canceling a confirmed intermediate result, you can change or delete the intermediate result.
Vahetulemused - videojuhend
Video vaatamiseks pead olema TÜ kasutajakontoga Microsoft Stream keskkonda sisse logitud. Logimiseks kliki sign in video aknas, sisesta uues aknas oma kasutajakonto andmed kujul: kasutajatunnus@ut.ee, sisesta parool ja vajuta nupule Sign in.
Video on eesti keeles. Videot on võimalik vaadata koos eesti- või ingliskeelsete subtittritega. Subtiitrite valimiseks pane video mängima ja vali (hammasratta ikoon) Settings → Captions / Subtitles.
Intermediate results - video tutorial
You must be logged in to the Microsoft Stream with a UT account to watch the video. To log in, click sign in on the video, enter your username in the new window as username@ut.ee, enter the password and click Sign in.
The video is in Estonian. The video can be watched with English or Estonian subtitles. To select subtitles, play the video and select (gear icon) Settings → Captions / Subtitles.
Kuidas sisestan hinde?
How do I enter grades?
- Hindeid saad sisestada ühekaupa või sisestades sama hinde mitmele õppijale korraga.
- Hindeid saad sisestada hinnetelehel või õppija hinde kaardil.
- You can enter grades one at a time or the same grade for multiple learners at once.
- You can enter grades on the grading sheet or on the learner's grade card.
Kuidas saan sisestada ühe hinde?
Õppijale hinde sisestamiseks on mitu moodust.
Kõige lihtsam on hinnet sisestada õppija nime real lõpphinde veerus (joonisel p 1). Väljal olevale pliiatsi ikoonile vajutades avaneb hüpikaknas hindeskaala. Hinnet saad valida sobivale hindele vajutades. Sinu poolt määratud hinne on kohe ka õppijale nähtav.

Õppijale saad hinnet sisetada ka hinde lahtri paremas servas plussmärgi kaudu. Kui hoiad hiirekursorit märgi kohal avaneb hüpikaknas hindeskaala, millest saad valida õppija hinde (joonisel p 2).

Vajutades uuesti lõpphinde veerule kuvatakse õppijale määratud hinne paksus kirjas (joonisel p 3).

Hinnet saad sisestada ka õppija hindekaardilt. Vajutades õppija nimele avaneb hüpikaknas õppija hindekaart. Hindeskaala kuvamiseks vajuta Lõpphinne juures pliiatsi ikoonile. Hinnet saad määrata, kui vajutad hindele, mida õppijale määrata soovid. Juhul kui õppijat ei ole veel hinnatud saad õppija hindekaardilt sisestada korralise hindamise tulemuse.
How can I enter one grade?
There are several ways to enter a grade for a learner.
The easiest way to enter a grade is in the grade box behind learner's name (see figure p 1 ). Clicking on a pencil icon will open a grading scale in a pop-up window. You can select a grade by clicking on it. The grade you set is immediately visible to the learner.

You can also enter a grade for the learner from the plus sign on the right side of the grade box. When you hover the mouse cursor over the plus sign, a grade scale opens in a pop-up window, from which you can select the learner's grade (see figure p 2).

Clicking the grades cell again will display the grade assigned to learner in bold (see figure p 3).

Another option is to enter a grade from the learner's grade card. Clicking on a learner's name will open the learner's grade card in a pop-up window. Click the pencil icon next to Final grade to display the grading scale. You can set a grade by clicking on the grade you want to assign to the learner. If the learner has not yet been assessed, you can enter the result of the regular assessment from the student's grade card.
Kuidas sisestada korraga hinnet mitmele õppijale?
How can I enter a grade for several students at the same time?
Kui õppeaines on palju õppijaid, on mugav kasutada korraga mitmele õppijale sama hinde määramise võimalust.
Hinde määramise nupp kuvatakse hinnetelehe tabeli päisesse, kui nimekirjast on valitud vähemalt üks õppija.
Täida märkeruudud õppijate nimede ees (joonisel p 1). Kui oled nimekirjast valinud need õppijad, kellele soovid ühesugust hinnet määrata, vajuta hinnetelehe päises olevale hinde nupule (joonisel p 2).

- Kui hindeid ei ole veel hinnete nupust määratud kuvatakse vaikimisi õppeaine hindeskaala kõrgeim hinne.
- Kui oled juba hindeid määranud, kuvatakse vaikimisi viimati määratud hinne.
Hinde nupule vajutades kuvatakse hindeskaala. Hinde määramiseks mitmele õppijale vali välja hinne ning vajuta nuppu Määra hinne (joonisel p 3). Hinde määramise nupule kuvatakse arvu, mitmele õppijale see hinne määratakse.

If there are many learners on the course, it is convenient to use the possibility to assign the same grade to several learners at once.
The button for assigning grades appears in the header of the grading sheet table if at least one learner is selected from the list.
Check boxes in front of the learners' names (see figure p 1). Once you have selected the learners to whom you would like to assign the same grade, click on the grade button in the header of the grading sheet (see figure p 2).
- If no grades have been assigned via the grades button, the highest grade in the course version's grading scale will be displayed by default.
- If you have already assigned a grade using the Assign a grade button, the last grade assigned will by displayed by default.
Pressing the grade button displays the grading scale for the course version. To assign a grade to several learners, select the grade and click the Set final grade button (see figure p 3). The button displays the number of learners to whom the grade will be assigned.

Kuidas lisan lõpphinded Moodle'ist?
How do I import final grades from Moodle?
- Hetkel saad Moodle'ist importida ainult lõpphindeid.
- Lõpphindeid saad üle kanda ainult nendel õppijatel, kes on Moodle'i kursusele lisatud ÕIS-i kaudu.
- Hetkel imporditakse lõpphinded kõigile õppijatele. Kui soovid hinnet sisestada ainult teatud õppijatele, siis kustuta imporditud hinded nendel õppijatel, keda sa hinnata ei soovi.
Oma kursuse Moodle'i seoseid saad lisada ja muuta ÕIS 2-s.
- Impordi lõpphinded Moodle'ist siis, kui kõik õppijad on lõpphinde saanud.
- At the moment, you can only import final grades from Moodle.
- You can only transfer final grades to those learners who have been added to the Moodle course through the SIS.
- Final grades are currently imported for all learners. If you wish to enter a grade for only certain learners, delete the imported grades for those learners whom you do not wish to grade.
You can add and edit Moodle links for your course in the SIS 2.
- Import final grades from Moodle when all learners have received their final grades.
Kas õppeainel on seos Moodle'i kursusega?
Kui soovid vaadata oma õppeaine Moodle'i seoseid, vajuta õppeaine andmete lehel nuppu Moodle'i seosed (joonisel p 1). Seejärel suunatakse sind lehele, kus saad vaadata kursuse lühikirjeldust Moodle'is, andmeid vastutava õppejõu kohta ning suunduda õppeaine Moodle'i kursusele.

Juhul, kui õppeainel puudub seos Moodle'i kursusega, saate selle luua järgides Moodle'i kasutajajuhendi punkti 2 - Seose loomine õppeaine versiooni ja Moodle'i kursuse vahele.
Kuidas importida Moodle'ist lõpphindeid?
Teadmiseks
Esmakordsel Moodle'ist lõpphinnete importimisel kuvatakse Moodle'ist imporditud lõpphinnete ette Moodle'i ikooni.
Kui soovid Moodle'ist lõpphindeid importida, ava Hinded lehel kolmpunktmenüü ning vajuta Impordi Moodle'i lõpptulemused (joonisel p 2).

Enne lõpphinnete importimist veendu, et Moodle'i hindetabeli lõpphinne on samas hindesüsteemis, mis on kirjas õppeaine versiooni juures. Täpsemalt õppijate hindamisest Moodle'is saad lugeda Moodle'i kasutajajuhendist.
Pärast nupule vajutamist imporditakse vastava Moodle'i kursuse lõpphinded. Juhul kui õppijal puudub Moodle'is lõpphinne, jääb tema hinne importimata ning ilmub loend Menetlemata jäänud õppijad.
Juhul, kui õppeaine versioonil puudub seos Moodle'i kursusega, kuvatakse Impordi Moodle'i lõpptulemused helehallina (joonisel p 3).

Moodle'ist imporditud lõpphindeid saad kinnitada, nagu ÕIS 2-e kaudu sisestatud hindeid.
Juhul kui mõni õppija on juba ÕIS-is hinnatud ning hinne kinnitatud, siis tema hinnet Moodle'i lõpptulemuse importimisel üle ei kirjutata. Kuid kui imporditav hinne erineb ÕIS2 hinnetelehel olevast kinnitamata hindest, siis kirjutatakse hinnetelehel olev hinne üle Moodle'ist imporditava muutunud lõpphindega.
![]() Juhul kui oled ÕIS-is mõne Moodle'ist imporditud lõpphinde kustutanud ning soovid uuesti lõpphindeid importida, siis veendu, et oled sulgenud X nupust süsteemiteate Moodle'i impordi kohta.
Juhul kui oled ÕIS-is mõne Moodle'ist imporditud lõpphinde kustutanud ning soovid uuesti lõpphindeid importida, siis veendu, et oled sulgenud X nupust süsteemiteate Moodle'i impordi kohta.

Is the course linked to the Moodle course?
If you would like to see the Moodle settings of your subject, click the Moodle settings button on the subject data page (see figure p 1). You will then be taken to a page where you can view a short description of the course in Moodle, the details of the main lecturer and go to the Moodle course page for the subject.

In case the course is not linked to the Moodle course, you can create the link by following the Moodle instructions' paragraph 2 - Creating a link between the course version and the Moodle course.
How can I import final grades from Moodle?
FYI
When importing final grades from Moodle for the first time, a Moodle icon is displayed in front of the final grades imported from Moodle.
If you would like to import final grades from Moodle, open the three-point menu in the Grades page and click Import Moodle final results (see figure p 2).

Before importing the final grades from Moodle, make sure that the final grade in the Moodle grade report is in the same grading scale as is described in the course version. You can read more about learner grading in Moodle in the Moodle instructions.
After clicking the button, the final grades of the corresponding Moodle course will be imported. If the learner does not have a final grade in Moodle, the import does not happen and a Skipped students list appears .
The Moodle icon is displayed in front of the final grades imported from Moodle.
If the course version has no connection to the Moodle course, the Import Moodle final results will be displayed in light gray (see figure p 3).

You can confirm the final grades imported from Moodle, like you confirm the final grades entered through the SIS 2.
If a learner has already been assessed in ÕIS and the grade has been confirmed, his/her mark will not be overwritten when the final results are imported into Moodle. However, if the grade that is being imported from Moodle differs from the assigned but not yet confirmed grade, then the grade will be overwritten with the grade that is imported from Moodle.
![]() In case you have deleted in the SIS some final grades imported from Moodle and you would like to import final grades from Moodle again, please make sure that you have closed the system message about importing final grades from Moodle by pressing the X button.
In case you have deleted in the SIS some final grades imported from Moodle and you would like to import final grades from Moodle again, please make sure that you have closed the system message about importing final grades from Moodle by pressing the X button.

Süsteemi teated lõpphinnete importimisel Moodle'ist
Juhul kui Moodle'i lõpptulemuste importimine ÕIS 2-te õnnestub, kuvab süsteem teadet selle kohta, mis Moodle'i kursuselt ning mituhinnet imporditi.
Juhul kui kõik õppijad on juba hinnatud, siis kuvab ÕIS moodle'ist hinnete importimisel teadet, et ühtegi uut lõpphinnet ei imporditud.

Juhul kui sul puudub õigus õppeaine lõpphindeid Moodle'ist importida, kuvatakse ÕIS-i vastav teade (vt joonist). Palun kontrolli, kas sind on Moodle'is õppeaine õppejõuks lisatud.

Juhul kui ÕIS'i ja Moodle'i lõpphindamise skaala ei ühti, kuvatakse järgnevat teadet. Hindamisskaalat saad parandada Moodle'is. ÕIS'is hindamissüsteemi muutmine on lubatud ainult kõigi õppijate nõusolekul.

Juhul kui lõpphinnete importimisel Moodle'ist tekib viga, kuvatb ÕIS järgmist teadet. Palun võta ühendus ÕIS-i kasutajatoega aaadressil ois.tugi@ut.ee.

System notifications for final grades when importing from Moodle
While importing final grades from Moodle the SIS informs you from which Moodle course the final grades were imported. The system also notifies you how many final grades were imported to the SIS.
If all the learners on the grading sheet have received their final grade and no new final grades are imported from Moodle, the corresponding message will be displayed in the SIS.

If you do not have the right to import the final grades of the course from Moodle, the corresponding message will be displayed in the SIS (see figure). Please check if you have been added as a lecturer in Moodle.

When final assessment scales in the SIS and Moodle do not match, the following message will be displayed. You can change the assessment scale in Moodle. In the SIS, changes to the assessment scale can only be made with the agreement of all learners.

If an error occurs when importing final grades from Moodle, the SIS will display the following message. Please contact the SIS helpdesk at ois.tugi@ut.ee.

Kuidas muuta hindamise kuupäeva?
How do I change the grading date?
- Hindamise kuupäev on õppija õppetulemuse kuupäev.
- Õppetulemus läheb õppija õppekava täitmise mahu arvutamisel arvesse sel semestril, mille kestuse sisse jääb hindamise kuupäev.
- Hindamise kuupäev kuvatakse õppija õppetulemuste lehele ÕISis ja akadeemilisele õiendile.
Vaikimisi kuvatakse hindamise kuupäevaks tänane kuupäev.
Vaikimisi määratud hindamise kuupäeva muutmiseks täida õppija nime rea ees märkeruut (joonisel p 1) ja ava hinnete tabeli päise kohal kuupäeva valiku aken (joonisel p 2).

Sisesta uus kuupäev klaviatuurilt või vali kalendrist (joonisel p 1). Vajuta kuupäeva kinnitamiseks nupule Määra kuupäev (joonisel p 2).

- Pärast kuupäeva määramist sisestatud hinde kuupäevaks märgitakse see uus muudetud kuupäev.
- Kuupäeva saad muuta ka siis, kui õppijale on juba hinne sisestatud.
- Kui mitmele õppijale on juba hinded sisestatud, täida nende hindamise kuupäeva muutmiseks märkeruudud kõigi õppijate ridade ees ja määra kuupäev.
- Kui õppija on lõpp- või kordushindamisele registreerunud, kuvatakse vaikimisi hindamise kuupäevaks tunni toimumise kuupäev.
- Sellise õppija hindamise kuupäeva muutmise soovist teata ois.tugi@ut.ee
- The date of assessment is the date of the learner's learning outcome.
- The study result is taken into account in the semester in which the assessment date falls when calculating the volume of completion of the student's curriculum.
- The date of the assessment is displayed on the learner's study results page in SIS and on the academic transcript.
By default, today's date is displayed as the grading date.
To change the default grading date, fill in the checkbox in front of the learner's name line (see figure p 1) and open the date selection window above the header of the grading table (see figure p 2).

Enter the new date on the keyboard or select from the calendar (see figure p 1). Click the Set date button to confirm the date (see figure p 2).

- If you enter a new grade after setting a date, that new date is set as the date of that grade.
- You can also change the date if a grade has already been entered for the learner.
- If grades have already been entered for more than one learner, fill in the checkboxes in front of all learners and set the date to change their grading date.
- If the learner has registered for the final assessment or resit, the date of the event will be displayed by default.
- Let us know at ois.tugi@ut.ee if it is necessary to change the date of such a grade.
Hindamise kuupäeva muutmine - videojuhend
Video vaatamiseks pead olema TÜ kasutajakontoga Microsoft Stream keskkonda sisse logitud. Logimiseks kliki sign in video aknas, sisesta uues aknas oma kasutajakonto andmed kujul: kasutajatunnus@ut.ee, sisesta parool ja vajuta nupule Sign in.
Video on eesti keeles. Videot on võimalik vaadata koos eesti- või ingliskeelsete subtittritega. Subtiitrite valimiseks pane video mängima ja vali (hammasratta ikoon) Settings → Captions / Subtitles.
Changing grading date - video tutorial
You must be logged in to the Microsoft Stream with a UT account to watch the video. To log in, click sign in on the video, enter your username in the new window as username@ut.ee, enter the password and click Sign in.
The video is in Estonian. The video can be watched with English or Estonian subtitles. To select subtitles, play the video and select (gear icon) Settings → Captions / Subtitles.
Kuidas lisada ja muuta õppijat hinnanud õppejõude?
How do I add or change a lecturer who has graded a learner?
- Vaikimisi kuvatakse selle õppejõu nime, kes sisestas õppija hinde ÕISi.
- Õppijat hinnanud õppejõu nime saavad muuta õppeaine versiooni vastutav õppejõud, haldustugi ja õppekorralduse spetsialist.
- Õppijat peab olema hinnanud vähemalt üks õppejõud.
- By default, the name of the lecturer, who entered the grade to SIS, is displayed.
- The name of the lecturer can be changed by the teaching staff member in charge for the course version, administrative support assistant and academic affairs specialist.
- The learner must have been assessed by at least one lecturer.
Kuidas määrata mitut õppejõudu?
Juhul kui õppijat on hinnanud mitu õppeaine versiooni õppejõudu, tuleb õppijat hinnanud õppejõudude nimed märkida ka hinnetelehele.
Mitme õppejõu lisamiseks täida õppija nime ees märkeruut (joonisel p 1) ja vajuta hinnetelehe päises õppejõu nimega nupule (joonisel p 2).

Nupule vajutades avaneb hüpikaken Õppejõud, kes hindasid.
Rippmenüüsse (vt joonis) kuvatakse kõik õppeaine versiooniga seotud õppejõud.

Mitme õppejõu määramiseks täida märkeruudud õppejõudude nimede ees (joonisel p 3) ning vajuta seejärel nupule Määra õppejõud (joonisel p 4).

Määratud õppejõud kuvatakse hinnetelehe veergu "Õppejõud" (vt joonis) pärast seda, kui õppijale on hinne sisestatud.

How to set several lecturers?
If the learner has been assessed by several lecturers of the course version, the names of the lecturers must also be indicated on the grading sheet.
To add several lecturers, check the box in front of the learner's name (see figure p 1) and click a button with the lecturer's name at the top of the grading sheet (see figure p 2).

By clicking the button a pop-up window Lecturers who gave grades will open.
The dropdown menu (see figure) will display all lecturers for the course version.

To set several lecturers check the box in front of the lecturer's name (see figure p 3) and click the button Set active lecturer (see figure p 4).

Active lecturers will be displayed in the grading sheet column "Lecturer" after a learner's grade has been set.

Kuidas muuta õppijat hinnanud õppejõudu?
Õppijat hinnanud õppejõu muutmiseks tähista märkeruut (joonisel p 1) õppija nime ees ning vajuta hinnetelehe päises õppejõu nimega nupule (joonisel p 2).

Nupule vajutades avaneb hüpikaken Õppejõud, kes hindasid.
Rippmenüüsse kuvatakse kõik õppeaine versiooniga seotud õppejõud. Õppijat hinnanud õppejõu lisamiseks tähista märkeruut õppejõu nime ees (joonisel p 1). Õppejõu eemaldamiseks õppija hinde juurest tühjenda märkeruut õppejõu nime juurest, kes õppijat ei hinnanud (joonisel p 1). Seejärel vajuta nupule Määra õppejõud (joonisel p 2).

Õppijat hinnanud õppejõud kuvatakse hinnetelehe veergu "Õppejõud" (vt joonis).

How can I change the lecturer who assessed the learner?
To change the lecturer who assessed the learner, check the box in front of the learner's name (see p 1) and click a button with the lecturer's name at the top of the grading sheet (see figure p 2).

By clicking the button a pop-up window Lecturers who gave grades will open.
The dropdown menu will display all lecturers for the course version. To add a new lecturer who has assessed a learner, select the check box in front of a lecturer's name (see figure p 1). To remove a lecturer from a learner's grade, empty the check box in front of a lecturer's name (see figure p 1) Click the button Set active lecturer (see see figure p 2).

The lecturers who assessed the learner will be displayed in the grading sheet column "Lecturer" (see figure).

Õppejõu määramine, lisamine ja muutmine - videojuhend
Video vaatamiseks pead olema TÜ kasutajakontoga Microsoft Stream keskkonda sisse logitud. Logimiseks kliki sign in video aknas, sisesta uues aknas oma kasutajakonto andmed kujul: kasutajatunnus@ut.ee, sisesta parool ja vajuta nupule Sign in.
Video on eesti keeles. Videot on võimalik vaadata koos eesti- või ingliskeelsete subtittritega. Subtiitrite valimiseks pane video mängima ja vali (hammasratta ikoon) Settings → Captions / Subtitles.
Setting adding and changing lecturers - video tutorial
You must be logged in to the Microsoft Stream with a UT account to watch the video. To log in, click sign in on the video, enter your username in the new window as username@ut.ee, enter the password and click Sign in.
The video is in Estonian. The video can be watched with English or Estonian subtitles. To select subtitles, play the video and select (gear icon) Settings → Captions / Subtitles.
Kuidas muuta hinnet?
How can I change a grade?
Muuta saad nii kinnitatud kui kinnitamata hinnet.
Kinnitatud hinne kuvatakse paksus kirjas.
You can change the grades that have to be confirmed or have already been confirmed.
A confirmed grade is shown in bold.
Hinne on veel kinnitamata
Juhul kui õppijale sisestatud hinne on kinnitamata, saad seda muuta või kustutada õppija hindekaardilt või hinnetelehe veerus "Lõpphinne".
Kinnitamata hinde muutmiseks hinnetelehe veerust "Lõpphinne" vajuta õppija nime taga olevale hinde lahtrile. Hüpikaknas avaneb õppija hindekaart, millele kuvatakse õppijale ÕIS-i sisestatud hinne, õppijat hinnanud õppejõu(dude) nimi(ed) ning hindamise kuupäev.
Hinnet saad muuta hindekaardil oleval hinnetepaneelil (joonisel p 1). Hinde kustutamiseks vajuta prügikasti ikoonile (joonisel p 2).

Hinnet saad muuta ka mitmel õppijal korraaga, kui tähistad õppijate nimede ees olevad märkeruudud (joonisel p 3) ning vajutad hinnetelehel tabeli kohal hinnete nuppu (joonisel p 4).

Avaneval hinnetepaneelil vali uus hinne (joonisel p 5). Hinde määramiseks vajuta nupule Määra lõpphinne (joonisel p 6).

The grade has not been confirmed
If the grade that has been submitted to the SIS is not confirmed, you can change or delete it from the learner's personal grade card or in the "Final grade" column of the grading sheet.
To change an unconfirmed grade in the "Final grade" column of the grade sheet, click the grade box behind the learner's name. A pop-up window will open showing the learner's grade, the name(s) of the lecturer(s) who have assessed the learner and the grading date.
You can change the grade in the grade panel on the learner's grade card (see p 1). To delete a grade, click on the Trash can icon (see p 2).

You can also change a grade for several learners at once by checking the boxes in front of the learners names (see p 3) and clicking the grades button which is located at the top of the table on the grading sheet (see p 4).

The grade panel opens. Choose a new grade (see p 5). To set a score, click the Set final grade button (see p 6).

Hinne on kinnitatud
Kinnitatud hinde muutmiseks tuleb tühistada viimasena kinnitatud hinne. Juhul kui õppijal on kinnitatud ka kordushindamise tulemus, tuleb põhihindamise kinnitatud tulemuse muutmiseks tühistada nii kordus- kui põhihindamise tulemused.
Kinnitatud hinde tühistamiseks ava selle õppija hindekaart, kelle tulemust soovid tühistada. Hindekaardi avamiseks vajuta õppija hindele. Vali kolmikpunktmenüüst (joonisel p 1) Tühista hinne (joonisel p 2).

Hinde tühistamiseks pead lisama vähemalt 10 tärgi pikkuse selgituse. Kui sisestatud põhjendus on piisavalt pikk, muutub Tühista hinne nupp aktiivseks.
Kõiki tühistatud hindeid saad vaadata õppija hindekaardil, avades menüüploki "Tühistatud hinded".
The grade has been confirmed
To change a confirmed grade, the last confirmed grade must be canceled. If the learner has also a confirmed resit grade, the grades for the resit and regular assessment must be cancelled in order to change the confirmed grade of the regular assessment.
To cancel a confirmed grade, open the grade card of the learner whose result you want to cancel. Click on a learner's grade to open the grade card. Choose from the three-point menu (see p 1) Cancel grade (see p 2).

You must add an explanation of at least 10 characters to cancel the grade. When the entered explanation is long enough, the Cancel grade button becomes active.
All canceled grades can be viewed on the learner's grade card by opening the "Canceled grades" menu block.
Hinnete muutmine - videojuhend
Video vaatamiseks pead olema TÜ kasutajakontoga Microsoft Stream keskkonda sisse logitud. Logimiseks kliki sign in video aknas, sisesta uues aknas oma kasutajakonto andmed kujul: kasutajatunnus@ut.ee, sisesta parool ja vajuta nupule Sign in.
Video on eesti keeles. Videot on võimalik vaadata koos eesti- või ingliskeelsete subtittritega. Subtiitrite valimiseks pane video mängima ja vali (hammasratta ikoon) Settings → Captions / Subtitles.
Entering muutmine - video tutorial
You must be logged in to the Microsoft Stream with a UT account to watch the video. To log in, click sign in on the video, enter your username in the new window as username@ut.ee, enter the password and click Sign in.
The video is in Estonian. The video can be watched with English or Estonian subtitles. To select subtitles, play the video and select (gear icon) Settings → Captions / Subtitles.
Kuidas hinnet kustutada?
How can I delete a grade?
Kustutada saad ainult kinnitamata hinnet.
Juhul kui oled õppijale sisestanud hinde, kuid soovid seda mingil põhjusel kustutada, saad seda teha õppija hindekaardil.
Õppija hindekaart avaneb, kui vajutad hinnetelehel õppija nimele (joonisel p 1) või lõpphinnete veerus õppijale sisestatud hindele (joonisel p 2).

Kui vajutasid õppija nimele, vajuta selle hinde muutmiseks/kustutamiseks pliiatsi ikoonile (joonisel p 3).

Hinnet saad kustutada õppija hindekaardil hinnete realt, vajutades prügikasti ikoonile (joonisel p 4).

Kui õppija hinne on juba kinnitatud, siis hinnet kustutada ei saa. Kinnitatud hinnet on võimalik tühistada. Kui hinne on tühistatud, saad sisestada uue hinde.
Only a grade that has not been confirmed can be deleted.
When you have already entered a grade to the SIS, but would like to remove it, then you can do it on the learner's personal grade card.
You can open the learner's grade sheet by clicking on the learner's name (see p 1) or by clicking the grade on the grading sheet's column Final grade (see p 2).

If you clicked on a learner's name, click on the pencil (see p 3) icon to change/delete that grade.

The learner's grade sheet will open as a pop-up. You can delete the grade by pressing the trashcan icon (see p 4).

If the learner's grade has already been confirmed, then you cannot delete the given grade. You can cancel a confirmed grade. If you cancel a grade, you can enter a new grade for the learner.
Kuidas kinnitada hinne?
How can I confirm a grade?
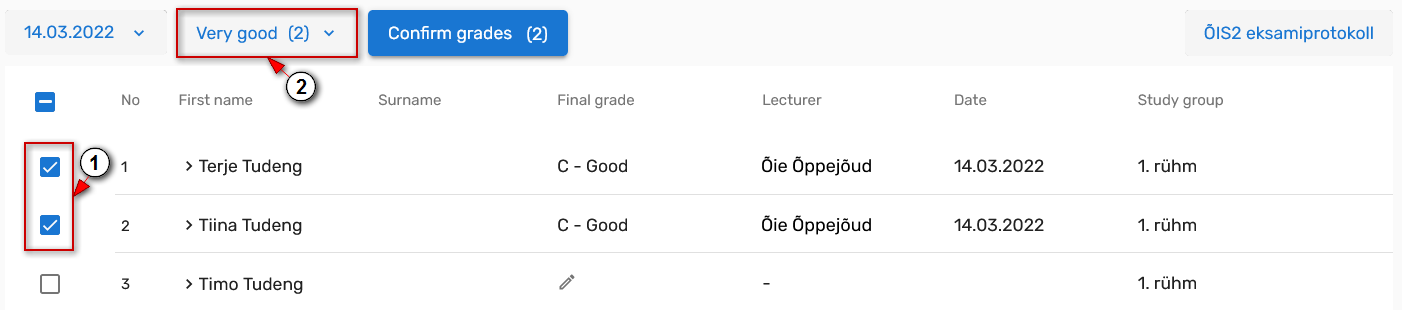
Hindeid saad kinnitada nii ühekaupa, mitu hinnet korraga kui ka kõik hinnetelehel olevad hinded korraga.

Kui oled veendunud, et kõik õppija hinde juures olevad andmed on korrektsed, siis vajuta nuppu Kinnita hinne (joonisel p 2).

Kui soovid kinnitada hinnet korraga mitmel õppijal, siis tähista märkeruudud nende õppijate nimede ees, kelle hindeid sa kinnitada soovid. Nupp Kinnita hinded näitab, mitu hinnet kinnitatakse (joonisel p 3).

Juhul kui soovid kinnitada kõik hinnetelehel olevad kinnitamata hinded korraga, tähista selleks hinnetelehe tabeli päises olev märkeruut (joonisel p 4). Automaatselt valitakse kõik hinnetelehel olevad õppijad, kellel on kinnitamata hindeid. Valitakse ka need õppijad, kellele pole hinnet veel sisestatud, kuid kinnitakase sisestatud hinded. Nupp Kinnita hinded näitab, mitu hinnet kinnitatakse.

Kinnitatud hinnet kuvatakse paksus kirjas.
You can confirm the grades one by one, several grades at a time or all the grades on the grading sheet all at once.

When you are sure that all the information by the learner's grade is correct, click the Confirm grade button (see p 2).

If you would like to confirm a grade for more than one learner at a time, check the boxes next to the names of the learners whose grades you would like to confirm. The Confirm grade button shows how many grades will be confirmed (see p 3).

If you would like to confirm all the unconfirmed grades on the grading sheet at once, check the box in the header of the grading sheet table (see p 4). All learners with unconfirmed grades on the grading sheet will be automatically selected. Please note that learners without a grade will also be selected, but only the grades entered will be confirmed. The Confirm grades button indicates how many grades will be confirmed.

A confirmed grade is shown in bold.
Teine samm: kordushindamise tulemuste sisestamine
Step 2: Enter the results of the resit
Kuidas saan sisestada kordushindamise tulemuse?
How do I enter a resit result?
Kui õppeaines kasutatakse lõpphindamist ja õppija korralise hindamise tulemus on negatiivne, on tal õigus ühele (kursusesüsteemis kohustuslikes ainetes kahele) kordushindamisele õppeaine toimumise semestril.
Kui õppeaines kasutatakse pidevhindamist, võimaldatakse õppijal vahehindamisi järele teha ainult siis, kui see on mõistlikult oodatav ja lähtutakse heast tavast, et hindamine on õiglane, erapooletu ninga õppimist toetav.
Kui õppeaines kasutatakse kombineeritud hindamist, lähtutakse lõpphindamise ja pidevhindamise kohta sätestatust, arvestades kombineeritud hindamise olemust selles õppeaines.
Vaata ka ÕKE p 50.
- Kordushindamise tulemuse saad sisestada õppijale, kelle korralise hindamise tulemus on kinnitatud.
- Kordushndamise tulemuse saad sisestada siis, kui lisatud on kordushindamise hinneteleht või ÕISi on lisatud kordushindamise toimumine ja õppija on sellele registreerunud.
If the final assessment is used in the course and the result of the regular assessment of the student is negative, they are entitled to one (two for compulsory courses taught in the year system) resit in the semester the course is taught.
If continuous assessment is used in a course, the learner will only be allowed to carry out interim assessments if this is reasonably foreseeable and based on good practice that the assessment is fair, impartial and supportive of learning.
If a combined assessment is used in a course, the provisions on final assessment and continuous assessment shall be followed, taking into account the nature of the combined assessment in that course.
See also Study Regulations p 50.
- You can enter the grade of the resit for a student whose regular assessment grade has been confirmed.
- You can enter resit result after adding a resit grading sheet or the re-assessment event has been added to the SIS and the learner has registered for it.
Kordushindamise lehe lisamine
Kordushindamise lehe loomiseks vajuta hinnete lehel kolmikpunktmenüüs (joonisel p 1) lingile Loo kordushindamise hinneteleht (joonisel p 2).

Kui hinne on sisestatud, kuvatakse õppija kordushindamise hinnetelehele.
Adding a resit grading sheet
To create a resit grading sheet, click the Add resit grading sheet (Figure 2) link in the three-point menu (Figure 1) on the grades page.

Once the grade is entered, the learner will be re-assessed on the grade sheet.
Kordushindamise tulemuse sisestamine
Kordushindamise tulemuse sisestamiseks vali korralise tulemuse juures pliiatsi nupule vajutades (joonisel p 1) Lisa kordushindamise hinne (joonisel p 2).

Entering the grades of the resit
To enter a resit result, select Add resit grade (Figure 2) from the pencil menu (Figure 1) next to the regular result.

Kordushindamise tulemuse saad sisestada samamoodi nagu korralise hindamise tulemuse.
You can enter the result of the resit in the same way as the result of the regular assessment.
- Hindeid saad sisestada ühekaupa või sisestades sama hinde mitmele õppijale korraga.
- Hindeid saad sisestada hinnetelehel või õppija hinde kaardil.
- You can enter grades one at a time or the same grade for multiple learners at once.
- You can enter grades on the grading sheet or on the learner's grade card.
Kuidas saan sisestada ühe hinde?
Õppijale hinde sisestamiseks on mitu moodust.
Kõige lihtsam on hinnet sisestada õppija nime real lõpphinde veerus (joonisel p 1). Väljal olevale pliiatsi ikoonile vajutades avaneb hüpikaknas hindeskaala. Hinnet saad valida sobivale hindele vajutades. Sinu poolt määratud hinne on kohe ka õppijale nähtav.
Õppijale saad hinnet sisetada ka hinde lahtri paremas servas plussmärgi kaudu. Kui hoiad hiirekursorit märgi kohal avaneb hüpikaknas hindeskaala, millest saad valida õppija hinde (joonisel p 2).
Vajutades uuesti lõpphinde veerule kuvatakse õppijale määratud hinne paksus kirjas (joonisel p 3).
Hinnet saad sisestada ka õppija hindekaardilt. Vajutades õppija nimele avaneb hüpikaknas õppija hindekaart. Hindeskaala kuvamiseks vajuta Lõpphinne juures pliiatsi ikoonile. Hinnet saad määrata, kui vajutad hindele, mida õppijale määrata soovid. Juhul kui õppijat ei ole veel hinnatud saad õppija hindekaardilt sisestada korralise hindamise tulemuse.
How can I enter one grade?
There are several ways to enter a grade for a learner.
The easiest way to enter a grade is in the grade box behind learner's name (see figure p 1 ). Clicking on a pencil icon will open a grading scale in a pop-up window. You can select a grade by clicking on it. The grade you set is immediately visible to the learner.
You can also enter a grade for the learner from the plus sign on the right side of the grade box. When you hover the mouse cursor over the plus sign, a grade scale opens in a pop-up window, from which you can select the learner's grade (see figure p 2).
Clicking the grades cell again will display the grade assigned to learner in bold (see figure p 3).
Another option is to enter a grade from the learner's grade card. Clicking on a learner's name will open the learner's grade card in a pop-up window. Click the pencil icon next to Final grade to display the grading scale. You can set a grade by clicking on the grade you want to assign to the learner. If the learner has not yet been assessed, you can enter the result of the regular assessment from the student's grade card.
Kuidas sisestada korraga hinnet mitmele õppijale?
How can I enter a grade for several students at the same time?
Kui õppeaines on palju õppijaid, on mugav kasutada korraga mitmele õppijale sama hinde määramise võimalust.
Hinde määramise nupp kuvatakse hinnetelehe tabeli päisesse, kui nimekirjast on valitud vähemalt üks õppija.
Täida märkeruudud õppijate nimede ees (joonisel p 1). Kui oled nimekirjast valinud need õppijad, kellele soovid ühesugust hinnet määrata, vajuta hinnetelehe päises olevale hinde nupule (joonisel p 2).
- Kui hindeid ei ole veel hinnete nupust määratud kuvatakse vaikimisi õppeaine hindeskaala kõrgeim hinne.
- Kui oled juba hindeid määranud, kuvatakse vaikimisi viimati määratud hinne.
Hinde nupule vajutades kuvatakse hindeskaala. Hinde määramiseks mitmele õppijale vali välja hinne ning vajuta nuppu Määra hinne (joonisel p 3). Hinde määramise nupule kuvatakse arvu, mitmele õppijale see hinne määratakse.
If there are many learners on the course, it is convenient to use the possibility to assign the same grade to several learners at once.
The button for assigning grades appears in the header of the grading sheet table if at least one learner is selected from the list.
Check boxes in front of the learners' names (see figure p 1). Once you have selected the learners to whom you would like to assign the same grade, click on the grade button in the header of the grading sheet (see figure p 2).
- If no grades have been assigned via the grades button, the highest grade in the course version's grading scale will be displayed by default.
- If you have already assigned a grade using the Assign a grade button, the last grade assigned will by displayed by default.
Pressing the grade button displays the grading scale for the course version. To assign a grade to several learners, select the grade and click the Set final grade button (see figure p 3). The button displays the number of learners to whom the grade will be assigned.
Kordushindamise kuupäeva saad muuta.
You can change the date of the resit.
- Hindamise kuupäev on õppija õppetulemuse kuupäev.
- Õppetulemus läheb õppija õppekava täitmise mahu arvutamisel arvesse sel semestril, mille kestuse sisse jääb hindamise kuupäev.
- Hindamise kuupäev kuvatakse õppija õppetulemuste lehele ÕISis ja akadeemilisele õiendile.
Vaikimisi kuvatakse hindamise kuupäevaks tänane kuupäev.
Vaikimisi määratud hindamise kuupäeva muutmiseks täida õppija nime rea ees märkeruut (joonisel p 1) ja ava hinnete tabeli päise kohal kuupäeva valiku aken (joonisel p 2).
Sisesta uus kuupäev klaviatuurilt või vali kalendrist (joonisel p 1). Vajuta kuupäeva kinnitamiseks nupule Määra kuupäev (joonisel p 2).
- Pärast kuupäeva määramist sisestatud hinde kuupäevaks märgitakse see uus muudetud kuupäev.
- Kuupäeva saad muuta ka siis, kui õppijale on juba hinne sisestatud.
- Kui mitmele õppijale on juba hinded sisestatud, täida nende hindamise kuupäeva muutmiseks märkeruudud kõigi õppijate ridade ees ja määra kuupäev.
- Kui õppija on lõpp- või kordushindamisele registreerunud, kuvatakse vaikimisi hindamise kuupäevaks tunni toimumise kuupäev.
- Sellise õppija hindamise kuupäeva muutmise soovist teata ois.tugi@ut.ee
- The date of assessment is the date of the learner's learning outcome.
- The study result is taken into account in the semester in which the assessment date falls when calculating the volume of completion of the student's curriculum.
- The date of the assessment is displayed on the learner's study results page in SIS and on the academic transcript.
By default, today's date is displayed as the grading date.
To change the default grading date, fill in the checkbox in front of the learner's name line (see figure p 1) and open the date selection window above the header of the grading table (see figure p 2).
Enter the new date on the keyboard or select from the calendar (see figure p 1). Click the Set date button to confirm the date (see figure p 2).
- If you enter a new grade after setting a date, that new date is set as the date of that grade.
- You can also change the date if a grade has already been entered for the learner.
- If grades have already been entered for more than one learner, fill in the checkboxes in front of all learners and set the date to change their grading date.
- If the learner has registered for the final assessment or resit, the date of the event will be displayed by default.
- Let us know at ois.tugi@ut.ee if it is necessary to change the date of such a grade.
Hindamise kuupäeva muutmine - videojuhend
Video vaatamiseks pead olema TÜ kasutajakontoga Microsoft Stream keskkonda sisse logitud. Logimiseks kliki sign in video aknas, sisesta uues aknas oma kasutajakonto andmed kujul: kasutajatunnus@ut.ee, sisesta parool ja vajuta nupule Sign in.
Video on eesti keeles. Videot on võimalik vaadata koos eesti- või ingliskeelsete subtittritega. Subtiitrite valimiseks pane video mängima ja vali (hammasratta ikoon) Settings → Captions / Subtitles.
Changing grading date - video tutorial
You must be logged in to the Microsoft Stream with a UT account to watch the video. To log in, click sign in on the video, enter your username in the new window as username@ut.ee, enter the password and click Sign in.
The video is in Estonian. The video can be watched with English or Estonian subtitles. To select subtitles, play the video and select (gear icon) Settings → Captions / Subtitles.
Kordushindamise tulemust saad muuta ja kustutada.
You can edit the result of the resit.
Muuta saad nii kinnitatud kui kinnitamata hinnet.
Kinnitatud hinne kuvatakse paksus kirjas.
You can change the grades that have to be confirmed or have already been confirmed.
A confirmed grade is shown in bold.
Hinne on veel kinnitamata
Juhul kui õppijale sisestatud hinne on kinnitamata, saad seda muuta või kustutada õppija hindekaardilt või hinnetelehe veerus "Lõpphinne".
Kinnitamata hinde muutmiseks hinnetelehe veerust "Lõpphinne" vajuta õppija nime taga olevale hinde lahtrile. Hüpikaknas avaneb õppija hindekaart, millele kuvatakse õppijale ÕIS-i sisestatud hinne, õppijat hinnanud õppejõu(dude) nimi(ed) ning hindamise kuupäev.
Hinnet saad muuta hindekaardil oleval hinnetepaneelil (joonisel p 1). Hinde kustutamiseks vajuta prügikasti ikoonile (joonisel p 2).
Hinnet saad muuta ka mitmel õppijal korraaga, kui tähistad õppijate nimede ees olevad märkeruudud (joonisel p 3) ning vajutad hinnetelehel tabeli kohal hinnete nuppu (joonisel p 4).
Avaneval hinnetepaneelil vali uus hinne (joonisel p 5). Hinde määramiseks vajuta nupule Määra lõpphinne (joonisel p 6).
The grade has not been confirmed
If the grade that has been submitted to the SIS is not confirmed, you can change or delete it from the learner's personal grade card or in the "Final grade" column of the grading sheet.
To change an unconfirmed grade in the "Final grade" column of the grade sheet, click the grade box behind the learner's name. A pop-up window will open showing the learner's grade, the name(s) of the lecturer(s) who have assessed the learner and the grading date.
You can change the grade in the grade panel on the learner's grade card (see p 1). To delete a grade, click on the Trash can icon (see p 2).
You can also change a grade for several learners at once by checking the boxes in front of the learners names (see p 3) and clicking the grades button which is located at the top of the table on the grading sheet (see p 4).
The grade panel opens. Choose a new grade (see p 5). To set a score, click the Set final grade button (see p 6).
Hinne on kinnitatud
Kinnitatud hinde muutmiseks tuleb tühistada viimasena kinnitatud hinne. Juhul kui õppijal on kinnitatud ka kordushindamise tulemus, tuleb põhihindamise kinnitatud tulemuse muutmiseks tühistada nii kordus- kui põhihindamise tulemused.
Kinnitatud hinde tühistamiseks ava selle õppija hindekaart, kelle tulemust soovid tühistada. Hindekaardi avamiseks vajuta õppija hindele. Vali kolmikpunktmenüüst (joonisel p 1) Tühista hinne (joonisel p 2).
Hinde tühistamiseks pead lisama vähemalt 10 tärgi pikkuse selgituse. Kui sisestatud põhjendus on piisavalt pikk, muutub Tühista hinne nupp aktiivseks.
Kõiki tühistatud hindeid saad vaadata õppija hindekaardil, avades menüüploki "Tühistatud hinded".
The grade has been confirmed
To change a confirmed grade, the last confirmed grade must be canceled. If the learner has also a confirmed resit grade, the grades for the resit and regular assessment must be cancelled in order to change the confirmed grade of the regular assessment.
To cancel a confirmed grade, open the grade card of the learner whose result you want to cancel. Click on a learner's grade to open the grade card. Choose from the three-point menu (see p 1) Cancel grade (see p 2).
You must add an explanation of at least 10 characters to cancel the grade. When the entered explanation is long enough, the Cancel grade button becomes active.
All canceled grades can be viewed on the learner's grade card by opening the "Canceled grades" menu block.
Hinnete muutmine - videojuhend
Video vaatamiseks pead olema TÜ kasutajakontoga Microsoft Stream keskkonda sisse logitud. Logimiseks kliki sign in video aknas, sisesta uues aknas oma kasutajakonto andmed kujul: kasutajatunnus@ut.ee, sisesta parool ja vajuta nupule Sign in.
Video on eesti keeles. Videot on võimalik vaadata koos eesti- või ingliskeelsete subtittritega. Subtiitrite valimiseks pane video mängima ja vali (hammasratta ikoon) Settings → Captions / Subtitles.
Entering muutmine - video tutorial
You must be logged in to the Microsoft Stream with a UT account to watch the video. To log in, click sign in on the video, enter your username in the new window as username@ut.ee, enter the password and click Sign in.
The video is in Estonian. The video can be watched with English or Estonian subtitles. To select subtitles, play the video and select (gear icon) Settings → Captions / Subtitles.
Kordushindamise tulemuse saad kustutada.
You can delete the result of the resit.
Kustutada saad ainult kinnitamata hinnet.
Juhul kui oled õppijale sisestanud hinde, kuid soovid seda mingil põhjusel kustutada, saad seda teha õppija hindekaardil.
Õppija hindekaart avaneb, kui vajutad hinnetelehel õppija nimele (joonisel p 1) või lõpphinnete veerus õppijale sisestatud hindele (joonisel p 2).
Kui vajutasid õppija nimele, vajuta selle hinde muutmiseks/kustutamiseks pliiatsi ikoonile (joonisel p 3).
Hinnet saad kustutada õppija hindekaardil hinnete realt, vajutades prügikasti ikoonile (joonisel p 4).
Kui õppija hinne on juba kinnitatud, siis hinnet kustutada ei saa. Kinnitatud hinnet on võimalik tühistada. Kui hinne on tühistatud, saad sisestada uue hinde.
Only a grade that has not been confirmed can be deleted.
When you have already entered a grade to the SIS, but would like to remove it, then you can do it on the learner's personal grade card.
You can open the learner's grade sheet by clicking on the learner's name (see p 1) or by clicking the grade on the grading sheet's column Final grade (see p 2).
If you clicked on a learner's name, click on the pencil (see p 3) icon to change/delete that grade.
The learner's grade sheet will open as a pop-up. You can delete the grade by pressing the trashcan icon (see p 4).
If the learner's grade has already been confirmed, then you cannot delete the given grade. You can cancel a confirmed grade. If you cancel a grade, you can enter a new grade for the learner.
Kordushindamise tulemus tuleb kinnitada.
The result of the resit must be confirmed.
Kolmas samm: protokolli kinnitamine
NB!
Kinnita protokoll alles siis kui oled ÕISi sisestatud kõik korraliste ja kordushindamiste tulemused!
Step 3: Confirm the report
NB!
Please confirm the examination report only after all grades for regular assessments and resits have been entered to the SIS!
Kuidas kinnitan protokolli?
How do I confirm the report?
Kes kinnitab eksamiprotokolli?
Eksamiprotokolli kinnitab õppeaine vastutav õppejõud kui kinnitatud on kõigi õppeaine versioonil õppijate hinded.
Protokolli kinnitamise nupp muutub aktiivseks, kui kõigi õppijate hinded on kinnitatud.

Who confirms the exam report?
The exam report is confirmed by the responsible lecturer of the course when the grades of all students in the course version have been confirmed.
The confirmation button for the examination report becomes active after all grades of all learners have been confirmed.

Kuidas luua eksamiprotokolli?
Eksamiprotokoll genereeritakse automaatselt, kui hinneid sisestatakse ÕIS 2-s.
Eksamiprotokolli eelvaadet näed, kui vajutad hinnetelehe tabeli kohal olevat Eksamiprotokolli nuppu, mis on kujutatud murtud nurgaga lehena (joonisel p 1).

Protokolli lehele kuvatakse õppeaine nimetus, õppeaine versiooni andmed, mille kohta protokoll vormistatakse, õppeaine versiooni vastutav õppejõud ning õppeaine versioonis õppijaid hinndanud õppejõu(dude) nimi(ed).
Protokolli lisatakse need õppijad, kellele on ÕIS 2 sisestatud ja kinnitatud lõpphinne.
Protokollivaatest saad liikuda tagasi hinnetelehele, kui vajutad lehe päises eksamiprotokolli ees olevat noolt (joonise p 2) või Back Space nuppu klaviatuurilt. Kasutada võid ka klahvikombinatsiooni "Alt" + "←"

How to create the examination report?
When grades are entered in SIS 2, the examination report is created automatically.
You can see a preview of the exam report by clicking the Examination report button, that looks like a sheet with bent corner, above the grading sheet table (see p 1).

The name of the course, the data of the course version for which the report is drawn up, the name of teaching staff member in charge for the course version and the name(s) of the lecturer(s) who evaluated the learners in the course version are displayed on the examination report page.
The learners who have an entered and confirmed final grade in SIS 2 will be added to the examination report.
You can return to the grading sheet from the examination report view by pressing the arrow in front of the examination report in the header of the page (see p 2) or use the Back Space button on the keyboard. You can also use the key combination "Alt" + "←"

Hinnetelehe eksamiprotokolli paneel
Eksamiprotokolli paneeli saad avada kolmpunktmenüüst, valides Eksamiprotokolli paneel (joonisel p 1).

Eksamiprotokolli paneelile kuvatakse kõiki õppeainega seotud protokolle ning nende protokollinumbreid ÕIS 1-s. Samuti kuvatakse eksamiprotokolli olekut (protokoll saab olla Sisekasutuses või Kinnitatud) ning hinnetelehe loomise ja eksamiprotokolli kinnitamise kuupäeva.
Lisainfona kuvatakse eksamiprotokolli paneeli ka hinnatud õppijate arvu ning kinnitatud lõpphindega õppijate arvu. Juhul kui õppijatel on tühistatud tulemusi võib hindega õppijate ning kinnitatud hindega õppijate arv olla erinev. Lisaks kuvatakse ka õppeainetesse registreerunud õppijate arvu.
The examination report panel on the grading sheet
You can open the Exam protocol panel from the three-point menu by selecting the Exam protocol panel (see p 1).

The panel of the examination report shows all the examination reports related to the course version and their examination report numbers in SIS 1. The status of the examination report (the report can be in "Registered" or "Confirmed") and the date of creation of the grading sheet and date when the the examination report was confirmed by the responsible lecturer are also displayed.
The number of learners assessed and the number of learners with a confirmed final grade will also be displayed in the examination report panel as additional information. If learners have grades that have been canceled, the number of learners with a grade and those with a confirmed grade may be different. In addition, the number of learners registered for the course version is also displayed.
Kuidas saan eksamiprotokolli kinnitada?
- Eksamiprotokolli saab kinnitada ainult õppeaine versiooni vastutav õppejõud.
- Eksamiprotokoll tuleb kinnitada mitte rohkem kui 30 päeva pärast viimase hindamise toimumist.
- Eksamiprotokolli saad kinnitada, kui kõikide õppijate hinded on kinnitatud.
- Õppeaine versiooni kohta luuakse üks eksamiprotokoll.
- Eksamiprotokoll on ainult eestikeelne.
Eksamiprotokolli eelvaadet näed, kui vajutad hinnetelehe tabeli kohal olevat Eksamiprotokolli nuppu, mis on kujutatud murtud nurgaga lehena (joonisel p 1).
Seejärel suunatakse sind eksamiprotokolli lehele. Eksamiprotokolli on lisatud kõik õppeaine versioonile registreeritud ning kinnitatud hinde saanud õppijad. Õppijad on eksamiprotokollis järjestatud eesnime järgi tähestikuliselt kasvavas järjestuses.
Eksamiprotokolli kuvatakse kõik õppijatele sisestatud lõpphinded, hindamiste kuupäevad, õppijat hinnanud õppejõud, kordushindamise käigus saadud hinde juurde kuvatakse tärni.

Eksamiprotokolli saad kinnitada lehekülje all olevast nupust Kinnita protokoll.
Pärast protokolli kinnitamist kuvatakse protokolli kinnitanud vastutava õppejõu nimi ning protokolli kinnitamise kuupäev.
How can I confirm an examination report?
- An examination report can be confirmed only by the teaching staff member in charge for the course version.
- The examination report must be confirmed no later than 30 days after the last assessment.
- You can confirm the examination report once all learners' grades have been approved.
- One examination report is created for the course version.
- The examination report is only in Estonian.
You can see a preview of the exam report by clicking the Examination report button, that looks like a sheet with bent corner, above the grading sheet table (see p 1).
You will then be redirected to the examination report page. All learners who have registered for the course version and have received a confirmed grade are included in the examination report. Learners are ranked in alphabetical order by first name in the examination protocol.
The examination report shows all the final grades entered for the learners, the dates of the assessments, the lecturer(s) who assessed the learned, resit result is market with a asterisk.
You can confirm the examination report using the Confirm protocol button at the bottom of the page.
After the examination protocol has been confirmed, the name of the responsible lecturer who confirmed the protocol and the confirmation date of the protocol are displayed.
Hea teada
Good to know
Mis on õppija hindekaart?
What is learner's grade card?
Isikliku hindekaardi saad avada õppija nimele klõpsates.
Õppija isiklikul hindekaardil on näha kõik tema poolt õppeaine versiooni raames saadud vahetulemused, hinded ja hoiatused.
Hindekaardil saad
- lisada vahetulemuste punkte
- muuta ja kustutada kinnitamata hinnet
- tühistada hinde kinnitust
- lisada kordushindamise tulemust
- hallata akadeemilise petturluse hoiatusi

You can open a personal grade card by clicking on the learner's name.
The learner's personal grade card shows all the intermediate results, gradesand warnings they have received within the course version.
On the grade card, you can
- add intermediate scores
- edit and delete an unconfirmed grade
- cancel confirmation of grade
- add the rresit result
- manage warnings for academic fraud

Kuidas kiiresti ja mugavalt hindeid sisestada?
How to enter grades quickly and conveniently?
Kiiresti ja mugavalt klaviatuurilt hinnete sisestamiseks kasuta kiirklahve.
Kiirklahvide juhised leiad hinnete lehe kolmikpunktmenüüst (vt joonis) või klaviatuurilt Fn+F1.

- Sobivad suur- ja väiketähed.
- Alt klahvi asemel on Apple'i seadmetes Option klahv.
Kiirklahvid lõpphinde sisestamisel hinde aknas
Hinde sisestamise, kinnitamise ja kustutamise järel avatakse järgmise õppija aken, õppejõudude ja kuupäeva määramisel aken suletakse.
- -: Mitteilmunud
- 0: Mittearvestatud
- 1: Arvestatud
- A: Arvestatud
- F: Mittearvestatud
- M: Mittearvestatud
- P: Arvestatud
- X: Sulge aken
- Nooleklahvid: Liigu edasi/tagasi
- ALT+C, ALT+K: Kinnita
- ALT+X: Kustuta
- ALT+T, ALT+D: Määra valitud kuupäev
- ALT+O, ALT+L: Määra valitud õppejõud
Kiirklahvid lõpphinnete sisestamine tabeli vaates
Õppijad peavad olema märgitud (linnutatud).
- SHIFT+(Hinde klahv): Salvesta vastav hinne
- ALT+H, ALT+G: Määra vaikiv hinne
- ALT+T, ALT+D: Määra valitud kuupäev
- ALT+O, ALT+L: Määra valitud õppejõud
- ALT+C, ALT+K: Kinnita
- ALT+X: Kustuta
Kiirklahvid vahetulemuse sisestamine hinde aknas
- Enter: Salvesta ja ava järgmise tudengi aken
- X: Sulge aken
- Nooleklahvid: Liigu edasi/tagasi
- ALT+C, ALT+K: Kinnita
- ALT+X: Kustuta
Kiirklahvid vahetulemuste sisestamine tabeli vaates
Vahetulemuse hinneteleht peab olema aktiivne. Kinnitamise ja kustutamise jaoks peavad õppijad olema valitud (linnutatud).
- ALT+S: Salvesta uued tulemused
- ALT+C, ALT+K: Kinnita
- ALT+X: Kustuta
Use keyboard shortcuts to enter scores quickly and conveniently from the keyboard.
Instructions for the keyboard shortcuts can be found in the three-point menu of the grades page (see figure) or on the Fn+F1 keyboard.

- You may use uppercase and lowercase letters.
- Alt key is Option in Apple computers.
Shortcut keys entering final grade in modal window
Next student panel will open after entering grade, confirming or deleting. Panel will be closed after setting lecturers or date.
- -: Not present
- 0: Fail
- 1: Pass
- A: Pass
- F: Fail
- M: Fail
- P: Pass
- X: Close panel
- Arrow keys: Move forward or backward
- ALT+C, ALT+K: Confirm
- ALT+X: Delete
- ALT+T, ALT+D: Set active date
- ALT+O, ALT+L: Set active lecturers
Shortcut keys entering final grades in table view
Student must be checked.
- SHIFT+(grade key): Save grade
- ALT+H, ALT+G: Set active grade
- ALT+T, ALT+D: Set active date
- ALT+O, ALT+L: Set active lecturers
- ALT+C, ALT+K: Confirm
- ALT+X: Delete
Shortcut keys entering intermediate result in modal window
- Enter: Save and open next student panel
- X: Close panel
- Arrow keys: Move forward or backward
- ALT+C, ALT+K: Confirm
- ALT+X: Delete
Shortcut keys entering intermediate results in table view
Intermediate grading sheet must be active. Students must be checked for confirming and deleting.
- ALT+S: Save new results
- ALT+C, ALT+K: Confirm
- ALT+X: Delete
Kuidas näen hinnete statistikat?
How do I see grade statistics?
Õppeaine versiooni õppijatele sisestatud hinnete graafiku vaatamiseks vali kolmikpunktmenüüst (joonisel p 1) Näita graafikut (joonisel p 2).

Kuvatakse hinnete graafiline vaade. Graafiku x-teljele kuvatakse õppeaine versiooni hindamissüsteemi hinded. Graafiku y-teljele kuvatakse hinde protsentuaalne esinemise sagedus.
- Joon (joonisel p 1) tähistab kõiki selle õppeaine versiooni hindeid.
- Kui oled rakendanud õppijate nimekirja filtreid, tähistavad tulbad (joonisel p 2) filtreeritud õppijate hindeid. Rakendatud filtrite silte kuvatakse ka graafiku päisesse.
- Graafiku vaate alumisse vasakusse nurka (joonisel p 3) kuvatakse kõigi hinde saanud õppijate arv ja kõigi tulemuste keskmine hinne. Joonisel kujutatud õppeaine versioonis on hinde saanud 64 õppijat ja nende keskmine hinne on 2,16.
- Graafiku vaate alumisse parempoolsesse nurka (joonisel p 4) kuvatakse nimekirja filtrile vastavate õppijate arv ja nende tulemuste keskmine hinne. Joonisel kujutatud õppeaine versioonis on hinde saanud 36 2.rühma registreerunud õppijat ja nende keskmine hinne on 1,89.

Hinde protsendi väärtust ümardatuna üks koht pärast koma näed, kui viid kursori joonisele. Järgmistel joonistel kuvatakse A saanud õppijate protsente (kõik õppijad ja filtreeri abil valitud õppijad).


To view the chart of students' grades in the course version, select Show chart (in Figure 2) from the three-point menu (Figure 1).

A graphical view of the scores is displayed. The x-axis of the graph shows the grades of the course version assessment scale. The y-axis of the graph shows the percentage frequency of the grade.
- The line (in Figure 1) indicates all the grades of this course version.
- Once you have applied the learner list filters, the columns (Figure 2) indicate the grades of the filtered learners. Labels for applied filters are also displayed in the graph header.
- The lower left corner of the graph view (Figure 3) shows the number of all students who received grades and the average grade for all results. In the version of the course shown in the figure, 64 students have received a grade and their average grade is 2.16.
- The lower right corner of the graph view (Figure 4) shows the number of learners matching the list filter and the average grade for their results. In the version of the course shown in the figure, 36 students registered in the 2nd group (2. rühm) have received a grade and their average grade is 1.89.

You can see the percentage value of the score rounded to one decimal place when you move the cursor over the figure. The following figures show the percentage of learners who received A (all learners and learners selected using a filter).


SEOTUD TEEMAD
RELATED TOPICS
Overview
Content Tools