
| Table of Contents | ||
|---|---|---|
|
| Table of Contents | ||||
|---|---|---|---|---|
|
Sissejuhatus
- Tartu Ülikooli Zoom-i keskkond: zoom.ut.ee
Zoom on populaarne ja võimekas videokonverentside lahendus
- Tartu Ülikoolil on haridusasutustele mõeldud litsents, mida saavad kasutada kõik, kellel on ülikooli e-posti aadress (Zoom-i ruumiga saab liituda 300 inimest)
- Tartu Ülikoolil on lisaks kaks Zoom Webinari litsentsi, mille kasutamisel saab osaleda 500 inimest, ja üks litsents 1000 inimesele. Webinari kasutamiseks palume pöörduda arvutiabi poole aadressil arvutiabi@ut.ee või telefonil 737 5500 (5500). Vaata ka juhendit: Veebiseminar Teamsis.
- Zoom-i eripärad ja olulised asjaolud:
- olemas on arvuti- ja nutiseadmerakendused ja seda saab kasutada ka veebilehitsejas
- koosolekul saab osaleda nii sisse logides kui ka anonüümselt
- Zoom on liidestatud Moodle'iga ning Moodle'i kursuselt on võimalik luua Zoom-i ruum ja seadistada selle kasutamine. Vastav juhend on leitav: https://sisu.ut.ee/juhendid/zoom
- Veebiseminane ei saa tudengid luua, aga nad saavad veebiseminarildel osaleda!
- Juhend varasemalt tasutud litsentsiga Zoom-i konto omanikele.
- Juhend sünkroontõlke lubamiseks ja kasutamiseks.
Kui soovid põhajliku ülevaadet Zoom-i võimalustest, vt ka Zoom-i õppevideod, vali sobiv live koolitus või vaata salvestust (inglise keeles).
Vaata videot Zoom-i koolitus Tartu Ülikooli jaoks (inglise keeles).
Introduction
- University of Tartu Zoom homepage: zoom.ut.ee
Zoom is the popular and powerful video conferencing solution.
The University of Tartu has a license for educational institutions, which can be used by anyone who has a university e-mail address (up to 300 people can join a Zoom room)
The University of Tartu also has two Zoom Webinar licenses, one which can be used by 500 people, and the other license for 1,000 people. If you wish to use the webinar, please contact computer support at arvutiabi@ut.ee or by phone
737 5500 (5500). Also check Webinar in Teams.Zoom features and important facts:
there are computer and smart device applications that can also be used in a web browser
you can participate in the meeting both by logging in or joining anonymously
- Zoom is interfaced with Moodle, and it is possible to create a Zoom room from a Moodle course and configure its use. The corresponding guide can be found at: here (in Estonian).
- Students can't create Webinars, but they can attend them!
- Refund for previously paid Zoom license.
- Language interpretation setup and usage.
If you want a comprehensive overview of Zoom's features, see also Zoom tutorial videos, select the appropriate live training or watch the recording.
Check this video about Zoom training for the University of Tartu.
| Note | ||
|---|---|---|
| ||
|
Koosolekute korraldamine

| Expand | |
|---|---|
|
| |
|
|
Lisainformatsiooni saamiseks vaata ka |
| Expand |
|---|
Installation, configuration and joining (Windows)
- Zoom is not pre-installed on university computers. It is strongly recommended that you download the software before using it on a web browser. See https://zoom.us/support/download.
- During installation, the software will ask to have access to use the microphone, camera and speakers. If you want to share your screen, you must also allow screen recording and disk access.
- After installing the software, meeting requests sent to you can be opened from Zoom.
- Once the software is installed, close the window and launch the sent meeting link (Open Zoom).
- Sign In with SSO.

- Enter "ut-ee" next to Company Domain.

- Enter your university username in the form of username@ut.ee.

- Only on first login will you be asked if you allow Zoom to connect to your calendar. This allows you to send events by mail and add a note to your calendars.
If you do not want to agree at first login, you can turn it on later manually from Personal -> Profile -> Calendar Integration.
- In the next window that opens, allow the Zoom software to open.

- Click I Agree to agree with Zoom Terms.
- Click Join with Video.
- Click Join with Computer Audio.
- If necessary, you can make changes to test microphone and speakers. Also check Zoom - Audio and video setup.
| ||
|
|

Installation, configuration and joining for Apple users


If you receive an error message when joining a Zoom meeting stating that you do not have access to the camera and microphone:
Select System Preferences → Securityand Privacy
| Expand | ||
|---|---|---|
| ||
|


Rakenduse kasutamine
Salvestamiseks valida
|
NB!
|
| Expand | ||
|---|---|---|
| ||
|
Using the application
- To record meeting, select a storage location inside the Zoom software. In the Recording panel, click Change and change the recording location to your desktop or your OneDrive folder. Network disk space is limited and Zoom Cloud storage is not available.
- The recording process on the computer must end before you close the computer (otherwise no recording will occur).
- After recording, upload your video to yourself (Owncloud, Dropbox, Google drive, or take it to a flash drive) or upload it immediately to a convenient location (Panopto / UTTV).
NB!
- Anyone who has already created a free Zoom account with the e-mail address of the University of Tartu will receive an e-mail about registration, in which Zoom's own page will open. There, an existing free license account can be linked to a university license.
- Anyone with a paid Zoom license related to the University of Tartu e-mail cannot log in at the moment, please contact helpdesk (arvutiabi@ut.ee, 737 5500 (5500)). The previously purchased paid license can then be removed from the account registered with the university's e-mail address and merged with the university's license. It is also possible to cancel the old license and get back the license fee. You can do this later from the Zoom page.
Joining a meeting
- If you are using a meeting code, click Join a Meeting and then enter the code in the Zoom window.
When you open a web link, sign in to the Zoom software first, otherwise you may be added as a guest to the meeting.
- If the camera image or sound does not work, see the Installation and setup manual.
| Expand | ||
|---|---|---|
| ||
Koosoleku looja peab koosoleku salvestama või võimaldama osalejale salvestamise võimaluse.
|

Video recording during Zoom meeting
The host must record the meeting or grant the ability to record to a participant.
Several people can be recording at the same time. When recording, the camera option selected by the recorder is taken into account.
- Make sure you have enough space on your disk. The average size per meeting is 1-1.5TB/hour.
- Start a Zoom meeting as the host.

- Click the option to Record. If there is a menu, select Record on this Computer.

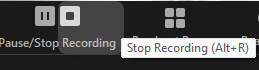
- During recording, different indicators are displayed according to the role:
- Recorders will see the Recording status indicator (1) in the top-left corner while recording is active.
- Recorders will see the Start recording, Pause and Stop recording buttons (2) in the bottom-center.
- Participants will see the Recording status indicator (3) in the top-left corner

NB! Dial-in participants will hear a message informing them that the meeting is now being recorded unless disabled by the host.
- To see which participants are currently recording, click Participants.
- To stop recording, click Stop Recording.
- In the upper right part of the screen, a message is displayed that The recorded file will be converted to mp4 when the meeting ends.

- To end the meeting, click End.

- After the meeting ends, Zoom converts the recording. The conversion must not be interrupted!
This process can be time-consuming when saving for a long time, do not turn off your computer!
- After the conversion is complete, the Zoom home page will open.
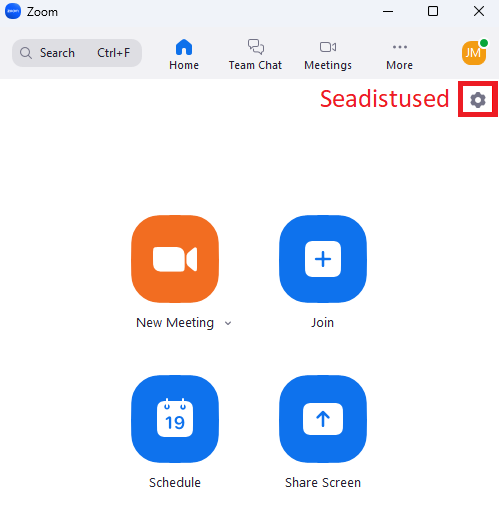
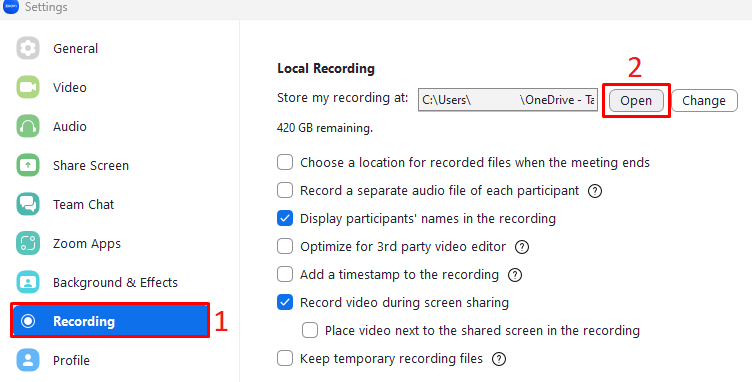
Click the Settings button at the top right.
- From the left tab, select Recordings.
Click Open.
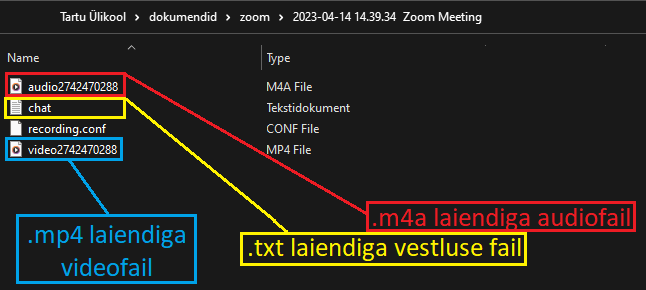
- The folder where the meeting recording was converted will open.

- Here you can find an overview of the files that were converted when recording the meeting:
- audio2742470288.m4a - .m4a extension video file.
- chat.txt - .txt extension chat file.
- video2742470288.mp4 - .m4a extension video file.

- Audio and video files will be formatted as (both files will have the same <id> associated to them):
- audio<id>.m4a, where <id> is an unique number.
- video<id>.mp4, where <id> is an unique number.
| Expand | ||
|---|---|---|
| ||
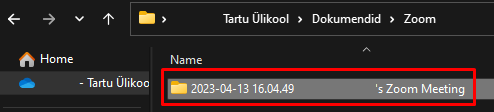
Vaikimisi paigutatakse kohalikud salvestised järgmisse kataloogi:
|

Change Zoom's recording location
By default, local recordings will be placed in following directory:
- Windows: C:\Users\[Username]\Documents\Zoom
- Mac: /Users/[Username]/Documents/Zoom
- Linux: home/[Username]/Documents/Zoom
|