
Siit juhendist leiad juhised kuidas kasutada rakendust Zoom.
| HTML Wrap | ||
|---|---|---|
| ||
| Table of Contents | ||
|---|---|---|
|
| Table of Contents | ||||
|---|---|---|---|---|
|
Sissejuhatus
Tartu Ülikooli Zoomi keskkond : https://zoom.ut.eeZoom on populaarne ja võimekas videokonverentside lahendus
. Tartu Ülikooli Zoom-i keskkond: zoom.ut.ee.
Zoom-i eripärad ja olulised asjaolud:
- osalejad saavad liituda telefonikõne, Zoom-i rakenduse või veebi kaudu
- koosolekul saab osaleda nii sisse logides kui ka anonüümselt
- Webinari ja Eventi ei saa tudengid luua, aga nad saavad osaleda
Zoom on liidestatud Moodle'iga ning Moodle'i kursuselt on võimalik luua
Zoom-i ruum ja seadistada selle kasutamine
. Täpsema informatsiooni leiad siseveebi juhendist.
Rohkem informatsiooni leiad:
Kõikidel Tartu Ülikoolil töötajatel ja üliõpilastel on haridusasutustele mõeldud litsents, mida saavad kasutada kõik, kellel on ülikooli e-posti aadress (Zoom-i ruumiga saab liituda 300 inimest).
- Koosolek (inglMeeting): kuni 300 osalejat; kõrge kvaliteediga videkonverent; osalejad saavad jagada oma ekraani; sünkorrontõlge; filtrid; küsitlused; korraldaja saab koosolekut salvestada
- Veebiseminar (ingl Webinar):kuni 500 osalejat; kontrollitud keskkond lihtsaks veebiseminiari haldamiseks korraldajale; korraldaja saab kohandada sündmuse brändingut ja juhtida, kes saab rääkida ja oma ekraani jagada; korraldaja saab kohandada veebiseminari registreerimisvorme ja e-kirju; korraldaja saab koosolekut salvestada
- Sündmus (ingl Event):kuni 1000 osalejat; võimalus korraldada hübriidset ja virtuaalset mitmepäevalist üritust; kontrollitud keskkond lihtsaks sündmuse haldamiseks korraldajale; korraldaja saab kohandada sündmuse brändingut ja juhtida, kes saab rääkida ja oma ekraani jagada; osalejad saavad korraldaga suhelda küsimuste ja vastuste, vestluse ja küsitluse kaudu; korraldaja saab sündmust voogesitada kolmandata osapoolte platvormidele ja manustada video veebilehele; korraldaja saab koosolekut salvestada; osalemise eelbroneerimise keskkond; võimalus luua võrgustikke (ingl networking), videokohtumisi ja töötubasid
| Note |
|---|
Webinar ja Events litsentsi kasutamiseks pöördu arvutiabi poole aadressil arvutiabi@ut.ee, kirja sisus märgi ära soovitud kuupäevad. |
Sisselogimine ja koosolekuga liitumine (Windows)
Introduction
- University of Tartu Zoom homepage : https://zoom.ut.ee
Zoom is the popular and powerful video conferencing solution.
The University of Tartu has a license for educational institutions, which can be used by anyone who has a university e-mail address (up to 300 people can join a Zoom room)
The University of Tartu also has two Zoom Webinar licenses, one which can be used by 500 people, and the other license for 1,000 people. If you wish to use the webinar, please contact computer support at arvutiabi@ut.ee or by phone 737 5500 (5500)
Zoom features and important facts:
there are computer and smart device applications that can also be used in a web browser
you can participate in the meeting both by logging in or joining anonymously
- Language interpretation setup and usage
If you want a comprehensive overview of Zoom's features, see also Zoom tutorial videos, select the appropriate live training or watch the recording.
Koosolekute korraldamine

Kasutamine ja paigaldamine
Ülikooli arvutitesse pole Zoomi eelpaigaldatud. Enne esimest kasutamist on tungivalt soovitav tarkvara alla laadida. Vt- Ülikooli Windows operatsioonisüsteemiga arvutitesse on Zoom eelpaigaldatud. Kui ei ole, siis tõmba alla siit:
- https://zoom.us/support/download.
- Paigaldamise ajal tuleb tarkvarale anda juurdepääs mikrofoni, kaamera ja kõlarite kasutamisele. Kui soovid pilti jagada, tuleb lubada ka ekraani salvestamist ja juurdepääsu kettale.
- Pärast tarkvara paigaldamist saab
- saadetud koosolekukutseid avada
Scheduling a meeting
Use and installation
- Zoom
Paigaldamine, seadistamine ja liitumine Windowsi operatsioonisüsteemiga
- -i programmist.
- Kui tarkvara on paigaldatud, sulge aken ja käivita saadetud koosolekulink
- vajutades nupule Open Zoom
- .
- Vali Sign In with SSO.

- Lahtrisse Company
- Domain kirjuta
- ut-ee
- (sidekriipsuga).

- Sisselogimiseks kasuta ülikooli kasutajatunnust formaadis kasutajanimi@ut.ee
- .


- Esimesel logimisel küsitakse üle, kas lubate
- Zoom-il enda kalendriga ühenduda. See annab võimaluse üritust e-kirja teel välja saata ja kalendritesse märge lisada. Hiljem on võimalik seda seadistust sätetest käsitsi sisse lülitada jaotusest Personal -> Profile -> Calendar Integration.


- Järgmises avanevas aknas luba
- Zoom-i tarkvara avanemine.

- Vajuta I agree, et nõustuda Zoom-i kasutamise tingimustega.
- Vajuta Join with Video, et ühineda koos kaamera pildiga.
- Vajuta Join with Computer Audio, et ühineda koos heliga.
- Vali õiged seadmed, mida soovid kasutada. Vajaduse korral saad
- teha muudatusi ning katsetada mikrofoni ja kõlarite toimimist
NB!
- Kellel on tasuta Zoomi konto juba tehtud Tartu Ülikooli e-posti aadressiga, saab registreerimise kohta e-kirja, milles avaneb Zoomi enda leht. Seal saab olemasoleva tasuta litsensiga konto siduda ülikooli litsentsiga.
- Kellel on Tartu Ülikooli e-postiga seotud tasuline Zoomi litsents ei saa hetkel sisse logida vaid peab võtma ühendust arvutiabiga. (arvutiabi@ut.ee , 737 5500 (5500)). Seejärel saab eelnevalt soetatud tasulise litsentsi ülikooli e-posti aadressiga registreeritud konto küljest ära võtta ning liita ülikooli litsentsi omaga. Võimalik on ka vana litsents tühistada ja litsentsitasu tagasi saada. Seda saab hiljem Zoomi lehelt teha.
Installation, configuration and joining for Windows users
- Download the software and launch the downloaded software :
- Enable installation
- Once the software is installed, close the window and launch the sent meeting link (Open Zoom)
- Sign In with SSO
- Enter "ut-ee" (hyphen) next to Company Domain
- Enter your university username in the form of username@ut.ee and password.
- Only on first login will you be asked if you allow Zoom to connect to your calendar. This allows you to send events by mail and add a note to your calendars. If you do not want to agree at first login, you can turn it on later manually from Personal -> Profile -> Calendar Integration
- In the next window that opens, allow the Zoom software to open.
- Agree to Zoom Terms (I Agree)
- Join with Video
- Join with Computer Audio
- If necessary, you can make changes to test microphone and speakers
NB!
- Anyone who has already created a free Zoom account with the e-mail address of the University of Tartu will receive an e-mail about registration, in which Zoom's own page will open. There, an existing free license account can be linked to a university license.
- Anyone with a paid Zoom license related to the University of Tartu e-mail cannot log in at the moment, please contact helpdesk (arvutiabi@ut.ee, 737 5500 (5500)). The previously purchased paid license can then be removed from the account registered with the university's e-mail address and merged with the university's license. It is also possible to cancel the old license and get back the license fee. You can do this later from the Zoom page.
- .
Lisainformatsiooni saamiseks vaata ka Zoomi kasutusjuhendit.
Juhised
| Expand | ||
|---|---|---|
| ||
|

|

|
|
|
|
|
|
|
|
|
|
|
|
Installation, configuration and joining for Apple users
- Download the software and launch the software:
- Enable installation (Continue)

- Once the software is installed, close the window and run the software
- Sign In with SSO
- Enter "ut-ee" (hyphen) next to Company Domain
- Enter your university username in the form of username@ut.ee and password.
- Join the conversation with a link or password.

- Allow camera access (OK)

- Choose whether or not to join the meeting via video camera (if necessary, you can choose the correct camera)

- Enable microphone access (OK)
- Start the meeting with computer sound (you can make changes if necessary to test the microphone and speakers)
- If you receive an error message when joining a Zoom meeting stating that you do not have access to the camera and microphone, select System Preferences → Security and Privacy and checkmark both the camera and microphone settings in zoom.us. Then save the changes.


Koosolekuga ühinemine
- Kui kasutad koosoleku koodi, vajuta Join a Meeting ja sisesta seejärel kood Zoomi aknasse

| Expand | ||
|---|---|---|
| ||
NB!
|
| Expand | ||
|---|---|---|
|
|
|
|
|
Joining a meeting
- If you are using a meeting code, click Join a Meeting and then enter the code in the Zoom window
| Expand | |
|---|---|
|
|
| |
Koosoleku |
looja peab koosoleku salvestama või võimaldama osalejale salvestamise võimaluse. |
Salvestada võib mitu inimest korraga. Salvestamisel arvestatakse seda kaameravalikut, mida salvestaja on valinud.
|

|

NB!
|

koosoleku looja pole selle keelanud.
|


|
|

Video recording during Zoom meeting
The host must record the meeting or grant the ability to record to a participant.
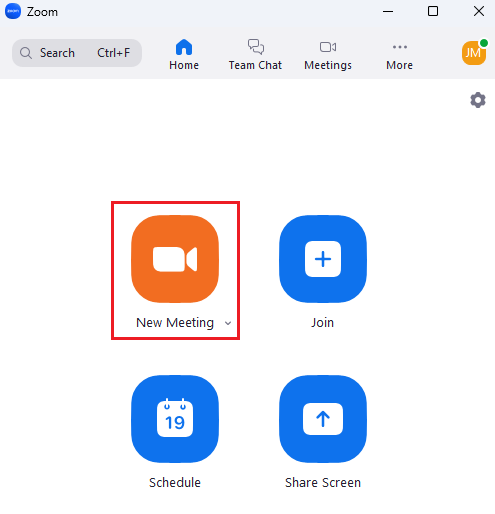
- Start a Zoom meeting as the host.
Click the option to Record.
- If there is a menu, select Record on this Computer.
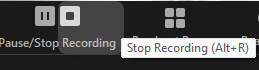
Hosts will see the following recording indicator in the top-left corner while recording is active. - Participants will see the following indicator in the top-left corner while the recording is active.
- Click Participants to see which participants are currently recording.
NB!
- Dial-in participants will hear a message informing them that the meeting is now being recorded unless disabled by the host.
- After the meeting has ended, Zoom will convert the recording so you can access the files. The transfer must not be interrupted!
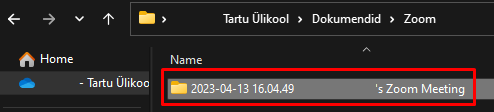
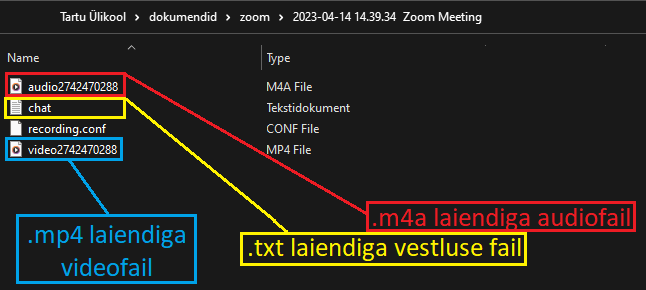
- Once the conversion process is complete, the folder containing the recording files will open.
- By default, the audio/video file (MP4) will be named Zoom_0.mp4. The audio only file (M4A) is named audio_only.m4a.
|

| Expand | ||
|---|---|---|
|
| |
Vaikimisi paigutatakse kohalikud salvestised järgmisse kataloogi:
|

Change Zoom's recording location
By default, local recordings will be placed in following directory:
Windows: C:\Users\[Username]\Documents\Zoom
Mac: /Users/[Username]/Documents/Zoom
Linux: home/[Username]/Documents/Zoom
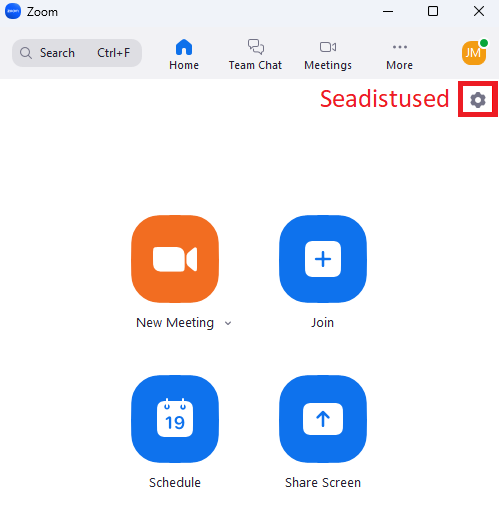
- To change the local recording location, click the Settings button on the top-left corner.
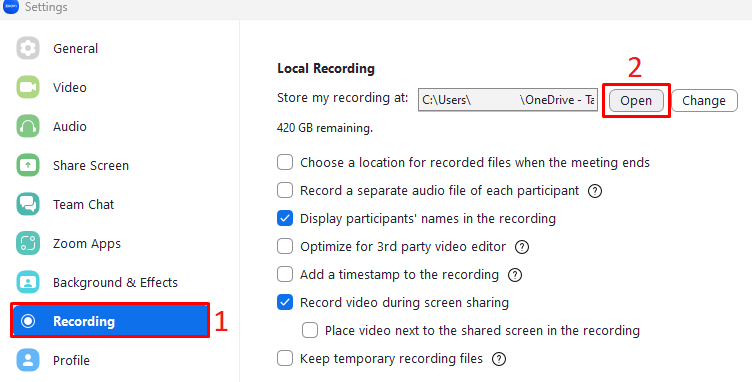
- Under the new menu, select Recording tab.
- Once the new tab is open, you can change the local recording location, by clicking the button Change.
