- Created by Joonas Masing, last updated on 20.12.2024 8 minute read
In this guide, you will find instructions on how to make more space in the Microsoft 365 environment during digital cleaning.
Guides
In Microsoft OneDrive, you can delete specific files and photos or entire folders with all their content. If needed, you can restore the deleted files from the OneDrive recycle bin.
- Go to OneDrive website using the following links:
- Select the files or folders you can to delete by pointing to each item and clicking the circle check box that appears.
- To select all files in a folder, click the circle to the left of the header row, or press CTRL + A on your keyboard.
- On the bar at the top of the page, select Delete. To delete the entire folder and its contents, select the folder and click on Delete on the bar above. You can also right-click the selected file or folder and select Delete.
Note: If you do not see the Delete icon in the top navigation bar, or when you right-click a selected item, you may not have permission to delete that file or folder.


- Your deleted files and folders go to the OneDrive recycle bin from which you can restore files if you need to.
- First, select Recycle bin in the OneDrive left side navigation.
- To permanently delete specific files or folders from the recycle bin, select those items, then select Delete in the top navigation.
- To permanently delete the entire recycle bin at once, select Empty the recycle bin in the top navigation.

- If you want to keep a file, photo or folder on your computer, but not on OneDrive, move the file from the OneDrive folder to a folder on your hard drive. (It works the same way in NextCloud)
- Meaning of icons:
- If you see a "people" icon next to your OneDrive files or folders, this indicates the file or folder has been shared with other people.
- A blue cloud icon next to a OneDrive file or folder indicates that the file is only available online. Online-only files don’t take up space on your computer.
- When you open an online-only file, it downloads to your device and becomes a locally available file. You can open a locally available file anytime, even without internet access.
If you need more space, you can change the file back to online only. Just right-click the file and select “Free up space”. - Only files that you mark as "Always keep on this device" have the green circle with the white checkmark.
These always available files download to your device and take up space, but they’re always there for you even when you’re offline. - The circular arrow icons signify that sync is in progress. This includes when you are uploading files, or OneDrive is syncing new files from the cloud to your PC.
- If you want to keep a file, photo, or folder on your OneDrive but not on your computer (because you don’t want it to take up space), put the file in your OneDrive folder, then turn on Files On-Demand (Windows) or Files On-Demand (Mac). You will still see the file name in the OneDrive folder on your computer, but it does not take up space on your computer until you open it.
- Select the white or blue cloud icon in the Windows notification area, and then select Help & Settings > Settings, then Backup > Manage backup.
- In the Back up your folders dialog, make sure the folders that you want to back up are selected.
- Select Start backup.
- You can close the dialog box while your files sync to OneDrive. Or, to watch your files sync, select View upload progress. If you already closed the dialog, to open the OneDrive activity center, select the white or blue cloud in the notification area.


- When you delete a file in SharePoint this might not free up space, as the file will remain in the recycle bin.
- If items are deleted in SharePoint, they remain in the database. They are relocated to the End User Recycle Bin. Items deleted from the End User Recycle Bin are relocated to the second stage of the recycle bin: Site Collection Recycle Bin. To free up space, items must be removed from that bin, as well.
- To delete a file for good and free up space, do the following:
- First, delete the file from the library.
- Go to the site’s recycle bin.
- Select the file and delete it there.
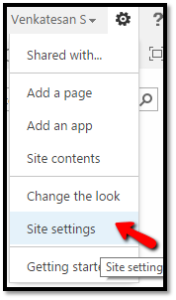
- Delete the file from the second-stage recycle bin. (By going to site settings)
- Under Recycle Bin, click on Collection Administration.
- Click on Deleted from end user Recycle Bin.
- Select the files you want to delete.




- Only delete emails that have a transitory value (such as junk mail, drafts, newsletters, automated messages, notifications, routine correspondence).
- For other items, it is advisable to review them before deleting in case any items need to be retained due to audit, public records or litigation holds.
- Right-click the folder you would like to delete from and select Properties. In the Properties dialogue box, go to the AutoArchive tab and select your desired settings.
- We do not advise using the option to move old items to a default archive folder. Hiding and forgetting about emails does not eliminate your responsibility for them. If an email must be retained, keep it in a folder in Outlook for easier access. If it doesn't need to be retained, just go ahead and delete it.


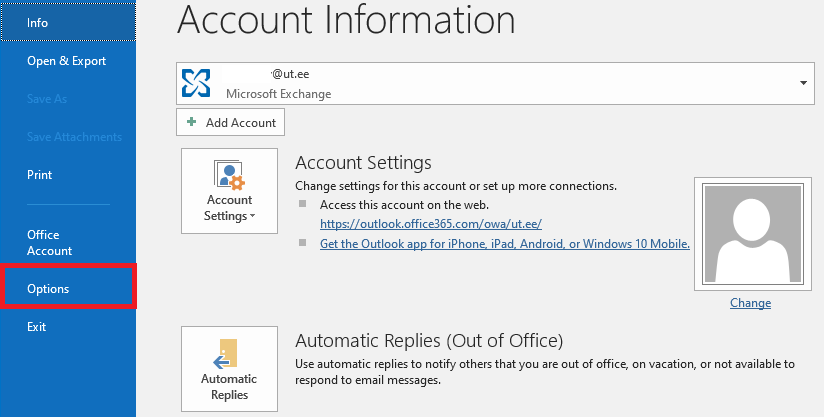
- Go to the tab File and then select Options.
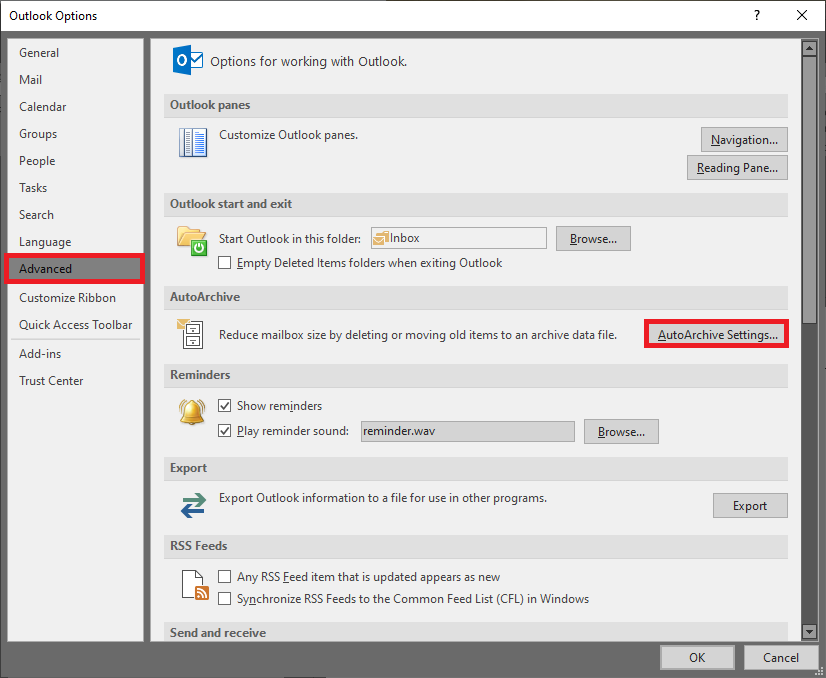
- In the left-hand menu, select Advancedand then click on AutoArchive Settings.
- Set the frequency of running AutoArchive and whether you want a prompt before AutoArchive runs.
It is advisable to permanently delete all deleted items, junk mail and other temporary emails at least once a month. There is a small risk of losing something necessary when deleting that sort of items, but if you want to do a quick review before deletion, you can set a prompt. Leave all other options unticked, as they should be selected only folder by folder.

- Open Outlook.
- Go to the File
- Select Options.
- Select Advanced.
- Under Outlook start and exit, tick the option Empty Deleted Items folders when exiting Outlook.
- To apply changes and close the window, click OK.
If you close Outlook, the following message will appear: “Do you want to permanently delete everything in the “Deleted items” folder for all accounts?” If you want to close the program and empty the “Deleted items” folder, select Yes. If you have other plans with the contents of the “Deleted items” folder, select No. Then the program will close, but when it is reopened, the “Deleted items” folder will still contain the items that were there when the program was last closed.
Note: If the folder is already empty, no message will be displayed before closing Outlook.


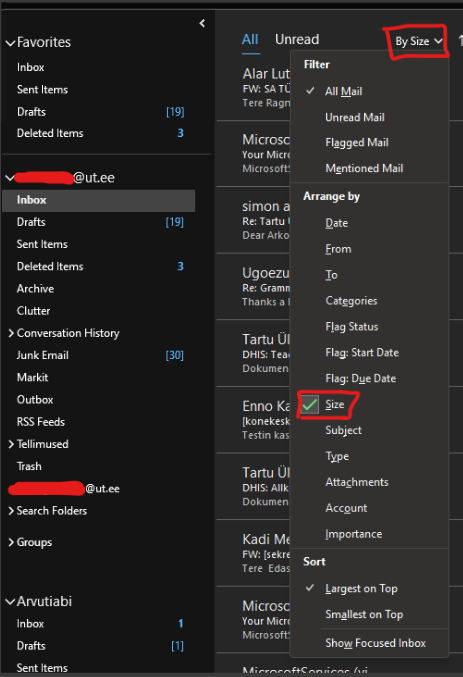
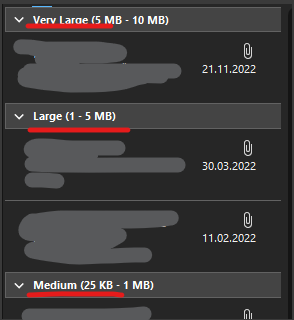
To find the largest emails from Your Outlook inbox, where You might have a large document or a picture for example, You need to change the view filter from "by date" to "by size". That will show You the largest emails as largest on top and smallest at the bottom. From there choose the desired emails and delete them.
While deleting You can use a shortcut key combination "Shift + Delete" which deletes the selected emails permanently and won't transfer them to the "Deleted items" folder.
NB! This method will delete the selected emails permanently and those emails won't be recoverable at all!
- No labels

This page has no comments.