Page tree

University of Tartu IT wiki

Versions Compared

Key

  • This line was added.
  • This line was removed.
  • Formatting was changed.

In this guide, you will find instructions about activating two-factor authentication on your account.

HTML Wrap
classbutton button1

(info) Eesti keeles


Two-factor authentication (commonly referred to as 2FA, MFA, multi-factor authentication) adds another layer of protection for your UT account and protects it from being used for malicious purposes even if your password has leaked. You can check how it works here.

Info

The requirement to setup two-factor authentication is enabledfor all universitystaff and students starting June 13, 2023.Duringyournext login to Microsoft-associatedapplications (Outlook, Teams, Moodle), youwillbepromptedforadditionalinformation and thesetup of two-stepauthentication. 

NB! We recommend the Microsoft Authenticator and Google Authenticator apps.

In addition, we recommend adding an SMS method in case something happens to the smart device where the applications are installed.

Both a smart device and a computer are required for setup.

Guides


Expand
titleFirst-time setup
  1. When first logging in to Microsoft services, you will be prompted with a More information required window. Click Next.
    Image Modified
  2. Select I want to use a different method.
    Image Modified
  3. From the drop-down menu, select Phone and click Confirm.
    Image Modified
  4. Select area code Estonia (+372) and enter your phone number. Then click Next.
    Image Modified
  5. A message will be sent to your phone number, the sender is Microsoft and the content is a 6 digit code.
  6. Enter the code on your browser and click Next.
    Image Modified
  7. Your phone was registered successfully. Click Next.
    Image Modified
  8. To finish the setup, click Done.
    Image Modified
  9. The next time you log in to Office365, in addition to the password, you will also be asked for the code that came with the message.
    If you are at your home or work computer, you can let the computer remember it, i.e. within 90 days, you will no longer be asked for the second-level code at a specific computer.
    NB! Do not trust a device you are not sure about.
    After typing in the code, click Verify.
    Image Modified


Expand
titleTwo-factor authentication using Microsoft Authenticator
  1. Install the Microsoft Authenticator application on your smart device via Google Play or App Store.
  2. On your computer, go to 365.ut.ee or kiri.ut.ee 
  3. Log in using the format username@ut.ee (login with username and password).
    Image Modified
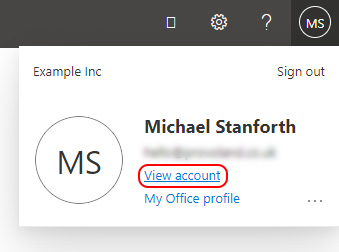
  4. Click on your profile → select View Account.
    Image Modified
  5. Select Update info.
    Image Modified
  6. Select Add sign-in method.
    Image RemovedImage Added
  7. From the menu, select Authenticator app and click Add.
    Image Modified
  8. In the next window click Next.
    Image Modified

    Info

    NB! If you accidentally chose the wrong authentication method, or if you want to set up the Google Authenticator app or SMS authentication instead, select I want to use a different authentication app.

    Image Modified

    Anchor
    qr_code_mfa
    qr_code_mfa

  9. To start your account set up, click Next.
    Image Modified
  10. Leave the next window open on your computer and pick up your smart device.
    Image Modified
  11. In the Microsoft Authenticator application select Add account.
    Image Modified

  12. Select Work or school account.
    Image Modified
  13. Select Scan QR code and scan the QR code in section 10 (the window you left open on your computer). 
    Image Modified
  14. The number 72 is displayed to test the application.
    Image Modified
  15. Once again, pick up your smart device, enter the number 72 and click Yes.
    Image Modified
  16. A confirmation that everything is working is displayed in the computer view.
    Image Modified
  17. Microsoft Authenticator setup was successful.
    Image Modified
  18. The next time you log in to the UT Microsoft 365 account, in addition to the password, you will prompted to insert the code displayed into the Microsoft Authenticator mobile application.
    When logging in from a web browser, it is possible to remember the device for 180 days, so that you do not have to re-enter the second level of verification every time.
    NB! Use it only for a personal or work computer.
    Image Modified
    Image Modified


Expand
titleTwo-factor authentication using Google Authenticator
  1. Install Microsoft Authenticator on your smart device via Play store or App store.
  2. On your computer, go to 365.ut.ee or kiri.ut.ee, click .
    Image Added
  3. Click on your profile → select View Account → select .
    Image Added
  4. Select Update info.
    Image Removed
    Image Removed
    Image Modified
  5. Select Add sign-in method.
    Image Modified
  6. Select I want to use a different authernticator app and click Next.
    Image Modified
  7. A QR code will be displayed. Keep this window open.
    Image Modified
  8. Pick up your smart device and scan the QR code by clicking Scan a QR code in Google Authenticator application.
  9. After scanning the QR code, Google Authenticator two-factor authentication is activated.


Expand
titleTwo-factor authentication using SMS
  1. On your computer, go to 365.ut.ee or kiri.ut.ee, click .
    Image Added
  2. Click on your profile → select View Account.
    Image Added
  3. Select → select Update info.
    Image Removed
    Image Removed
    Image Removed
    Image Added
  4. Select Add sign-in method.
    Image Added
  5. From the drop-down menu, select Phone and click Add.
    Image Added
  6. Select area code Estonia (+372) and enter your phone number. Then click Next.
    Image Added
  7. A message will be sent to your phone number, the sender is Microsoft and the content is a 6 digit code.
    Image Added
  8. Enter the code on your browser and click Next.
    Image Added
  9. SMS authentication is activated. To finish, press Done.
    Image Added
  10. After setting up, the mobile phone number to which it is associated will be displayed.
  11. The next time you log in to Office365, in addition to the password, you will also be asked for the code that came with the message. If you are at your home or work computer, you can let the computer remember it, i.e. within 180 days, you will no longer be asked for the second-level code at a specific computer.
    NB! Do not trust a device you are not sure about.
    Image Added


Expand
titleTelefoni numbri muutmine
  1. Open the website https://mysignins.microsoft.com/security-info.
  2. Sisselogimiseks kasuta formaati kasutajatunnus@ut.ee (sisenemine kasutajatunnuse ja parooliga).
  3. Avanevas aknas kuvatakse seadmed ja telefoni numbrid, mis on sinu kasutajaga seotud. Vana numbri kustutamiseks vajuta telefoninumbrist paremal olevale nupule Kustuta.
    Image Added
  4. To confirm, click the OK button.
    Image Added
  5. After deleting your old phone number, select Select Add sign-in method.
    Image Modified
  6. From the drop-down menu, select Phone and click Add.
    Image Modified
  7. Select area code Estonia (+372) and enter your phone number. Then click Next.
    Image Modified
  8. A message will be sent to your phone number, the sender is Microsoft and the content is a 6 digit code.
  9. Enter the code on your browser and click Next.
    Image Modified
  10. SMS authentication is activated. To finish, press Done.
    Image Modified
  11. After setting up, the mobile phone number to which it is associated will be displayed.
  12. The next time you log in to Office365, in addition to the password, you will also be asked for the code that came with the message. If you are at your home or work computer, you can let the computer remember it, i.e. within 180 days, you will no longer be asked for the second-level code at a specific computer.
    NB! Do not trust a device you are not sure about.
    Image Modified


Expand
titleSeadme vahetamine
  1. Ava veebilehekülg https://mysignins.microsoft.com/security-info.
  2. Log in using the format username@ut.ee.
  3. In the window that opens, all added devices and phone numbers will be shown. To remove a device, click the Delete button next to the application you would like to remove.
    Image Added
  4. To confirm, click the OK button.
    Image Added
  5. To add a new device, follow the Microsoft Authenticator or Google Authenticator instructions.