Page tree

University of Tartu IT wiki

Versions Compared

Key

  • This line was added.
  • This line was removed.
  • Formatting was changed.

In this guide, you will find instructions about setting up Apple Mail on Mac.

HTML Wrap
classbutton button1

(info) Eesti keeles


Note
iconfalse

English guide.Image Removed  English version can be found here: Apple Maili seadistamine Macis.

Table of Contents

Introduction

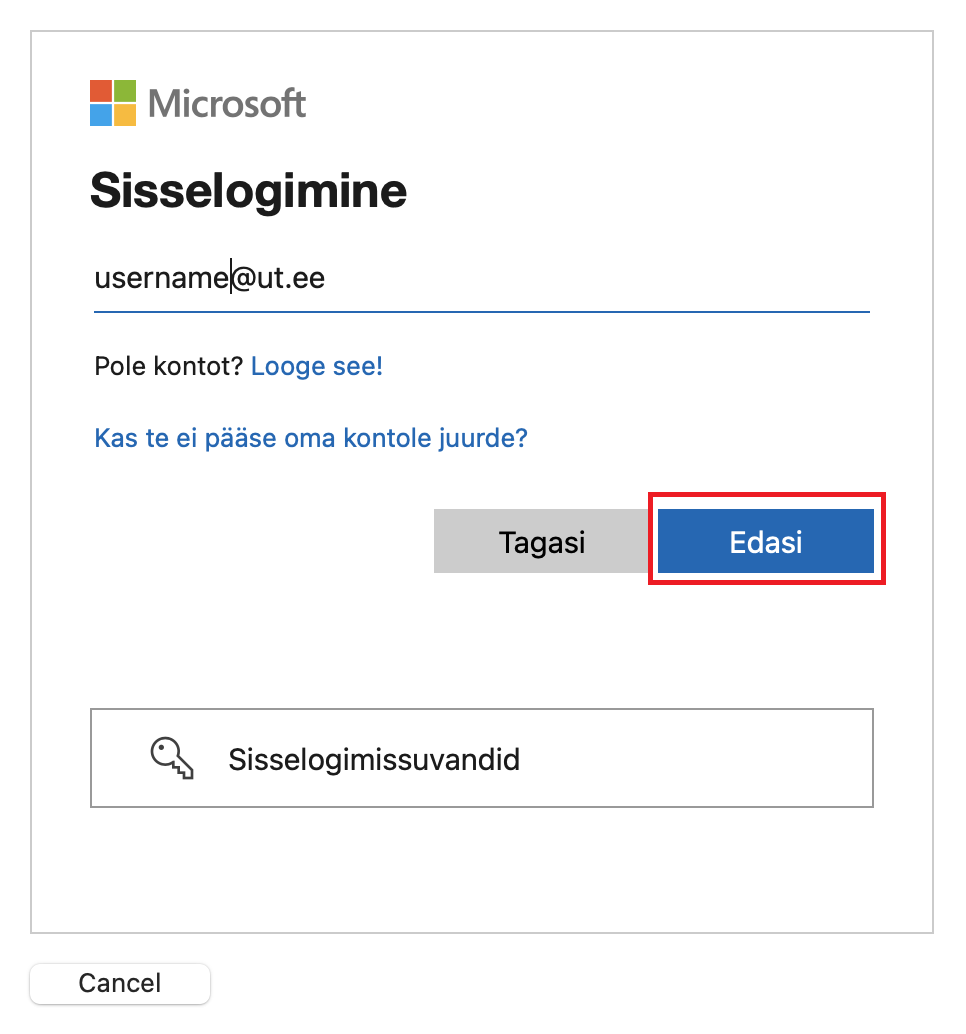
This guide is designed to set up Apple iCloud Mail for Macbook Air, Macbook Pro, iMac and Mac Studio.

Note

When using cloud service,

please apply

applying two-factor authentication

as soon as possible

is mandatory: 

Activate

Activating two-factor authentication

in Microsoft 365

.

Setting up

Guides

Expand
titleFirst time setup
  1. From the applications toolbar, select Mail.
    Image Modified
  2. In the opened window, select Microsoft Exchange and click Continue.
    Image Modified
  3. Fill in the fields as following:
    1. Name: your name as "Tuuli Tudeng"
    2. Email Address: UT username as "tuuli.
tudeng@ut
    1. tudeng@ut.ee"
    2. Then click Sign In.
      Image Modified
  1. Sign in to your Exchange account using Microsoft. To confirm, select Sign In.
    Image Modified
  2. The Microsoft sign in window opens. Enter the username as "tuuli.tudeng@ut.ee" and then press the Edasi button.
    Image Modified
  3. Enter the password and press the Sisselogimine button.
    Image Modified
  4. NB! If you already have 2FA authentication, you will also be asked to confirm your login.
    Enter the two-step authentication code
    (e.g. from SMS or the Microsoft Authenticator application)and press the Kinnita.
    Image Modified
  5. The Apple iCloud Mail application asks for permission to use your data. Press Nõustu to accept..
    Image Modified
  6. Select the apps you want to use with your Microsoft Exchange account, then click Done.
    Image Modified
  7. The latest updates are displayed, press the Continue button to proceed.
    Image Modified
  8. To protect e-mail activity (hides the IP address and downloads e-mail content privately), select Protect Mail activity and press Continue.
    Image Modified
  9. The UT mailbox has been successfully set up in the Apple iCloud Mail application.
    Image Modified


Expand
titleAdd more e-mail accounts
  1. Open the Mail application. 
    Image Added
  2. In the top left tab, select Mail → Settings.
    Image Added
  3. Choose a Mail account provider and click Continue.
    NB!
    When setting up your Gmail account, make sure to select Google.
    Image Added